Blackberry Torch 9800 Take Apart Repair Guide
June 4, 2018 | 0 Comments
View the downloadable version of our how to fix a Blackberry Torch 9800 screen guide.
This repair guide shows how to take apart and disassemble the Blackberry Torch 9800 cell phone quickly and safely so you can replace a cracked touch screen digitizer, or a broken LCD screen. This instructional repair guide is designed by the Repairs Universe team.
The guide will help you to install the following Blackberry Torch 9800 part(s):
- Blackberry Torch 9800 Touch Screen Digitizer Replacement
- Blackberry Torch 9800 LCD Screen Replacement Display
- Blackberry Torch 9800 Trackpad Replacement Part
Tools Required:
Blackberry Torch 9800 Take apart guide:
- First of all remove the battery cover of the phone by sliding it down and then take the battery out as well.
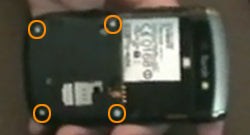
Figure 1
- Remove the warranty tab and then using a T6 Torx screwdriver, unscrew 4 screws from the locations shown in figure 1.

Figure 2
- After removing the screws you need to slide open the phone and then use a safe open pry tool to unclip the clips to remove the bezel. Insert the safe open pry tool between the edges that separates the bezel and the body of the phone and pry up the clips (refer to figure 2). Once you have all the clips unclipped, you will need to slide the bezel off from the top to remove it completely.
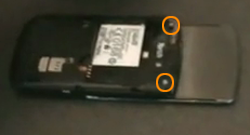
Figure 3
- Remove two more T6 screws from the back of the phone using T6 Torx screwdriver. The locations of these screws are mentioned in figure 3. Also remove the back plate (battery compartment) of the phone.
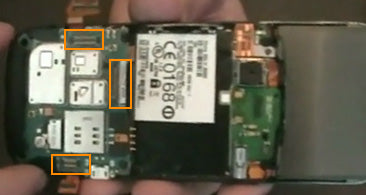
Figure 4
- With the back plate removed you will be able to access three flex cable connectors at the locations shown in figure 4. Use safe open pry tool to disconnect these cables from their connectors. For the flex cable located at the center you will have to peel off a sticker first before you could unclip this.
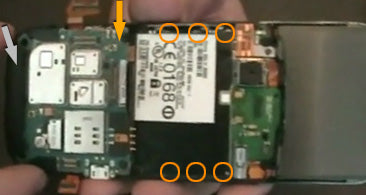
Figure 5
- Gently flip the motherboard up from the bottom (as indicated by a silver arrow in the figure 5) but be careful because you still need to disconnect the antenna cable before you could remove it from the unit. The orange arrow in figure 5 points to the location of the antenna cable connector but actually it is on the lower side of motherboard and can only be accessed when you will flip the motherboard up.
- You will now have to unscrew six T3 screws (three screws from each side). But in order to reach these screws, you need to peel off the tape covering these screws from both sides. Refer to the figure 5 to see the locations of the screws.
- Carefully separate the slider screen from the unit by running its flex cable through the gap.
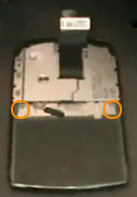
Figure 6
- Unscrew two more T3 screws at the locations shown in the figure 6 using a T3 Torx screwdriver.

Figure 7
- Now slide the bottom sliding part up to remove two more screws at the bottom, the locations are shown in the figure 7. Use a T2 Torx screwdriver to unscrew these screws.
- You will now need to remove a small black plate at the bottom of the unit but in order to do that you will first have to unscrew two more screws from the black plate using T3 Torx screwdriver. The locations are shown in the figure 7. Once you have these screws removed, lift up and remove the plate.
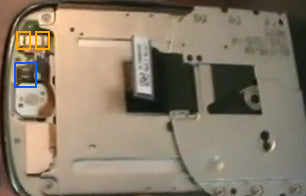
Figure 8
- In order to remove the trackpad from the phone you need to unhook the flex cable at the location shown in the figure 8 by a blue square and then unclip the two small clips at the locations shown in the figure 8 by small orange squares.
- Using a triangle safe open pry tool gently pry up the digitizer but be careful while lifting it up from the top because there is a flex cable connected with it underneath so do not lift it up too much at the top side. Run the safe open pry tool along the edges and the digitizer will be released but you will not be able to remove it completely from the unit at this stage because you still have to detach its flex cable.
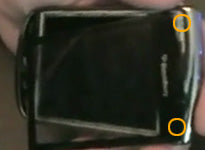
Figure 9
- You will now need to unscrew two T3 screws using a T3 Torx screwdriver from the locations shown in the figure 9.
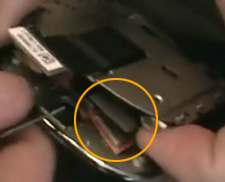
Figure 10
- Detach the flex cable at the location shown in figure 10 and remove the back plate from the front panel. The orange arrow in figure 11 points to the disconnected cable.
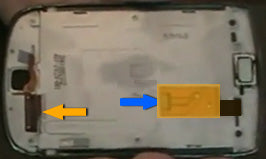
Figure 11
- In order to detach the flex cable of the digitizer, peel off the sticker that is covering it, at the back of the front panel (the orange rectangle in figure 11 shows the location). After peeling off the sticker, lift the clip up from the direction indicated by blue arrow and then slide out the flex cable.
- With its flex cable disconnected, you can now remove the digitizer by running its flex cable through the gap.
- Use a safe open pry tool to remove the LCD. Insert the safe open pry tool between the edges and carefully lift up the LCD. Be careful while lifting it up at the bottom because you will need to run its flex cable through the gap before you could remove it completely.
The Blackberry Torch 9800 is now disassembled and you can replace the damaged part(s) with new ones. Reverse the instructions above to reassemble your phone.
Applying Adhesive to the Touch Screen Digitizer:
Notice:
Repairs Universe's guides are for informational purposes only. Please click here for details.
Learn about restrictions on reproduction and re-use of Repairs Universe's repair/take-apart/installation guides, and about creating hyperlinks to our guides.