iPad Screen Repair Take Apart Repair Guide
June 4, 2018 | 0 Comments
View the downloadable version of our how to fix your iPad 1G screen guide
This is a iPad repair guide that will walk you through all the steps required to fully disassemble and repair your tablet. Following this guide will insure a quick and safe repair is done, with specific instructions for replacing the glass touch screen digitizer and LCD screen. This video guide has been put together by the RepairsUniverse team.
This guide will help you to install the following iPad parts:
- iPad Glass Touch Screen Digitizer Replacement
- iPad LCD Screen Replacement
- iPad Mid Frame Bezel Replacement
- iPad Home Button Replacement
Recommended Tools:
- iPad Opening Tool for iPad Repair
- T3 Torx Screwdriver
- Safe Open Pry Tool
- Small Flathead Screwdriver (optional)
iPad Screen Replacement Take Apart Guide:
We recommend fully watching the video before starting the repair, and then pausing / rewinding and reviewing when needed.
Removing the Touch Screen from Mid-Frame:
Simply reverse the instructions above to reassemble your phone.
iPad Repair Guide Written Summary
This take apart guide shows how to and disassemble the iPad quickly and safely so you can replace the glass touch screen or LCD screen.
iPad Take apart guide:
-
First of all take the iPad Opening tool available at Repairs Universe.com and slide it between the display screen of the iPad and the metal frame (aluminum frame) to pry up the screen on each side. This will release the tabs that hold the screen together. Beware that some of the clips (tabs) may break in the process, and you will need to replace them. You can greatly minimize the risk of damaging these clips during prying by using iPad Opening Tool which is specifically designed for this purpose. When prying off the screen you need to be careful not to pry near the the Volume button, head phone port and Home button as you could damage these parts.

Figure 1
-
As you open the case you will need to release one of the ribbon cables that is connected to the board indicated by the green arrow-head in figure 1. Using a safe open pry tool you must flip up both locks (shown by the orange arrow-heads in figure 1) that hold the ribbon in place before you are able to slide the ribbon out.
-
You will then have to unplug the connector from the motherboard shown by the blue arrow-heads in figure1. It will be very easy to pull it up and off the motherboard. It is just like a plug and will pop right off.

Figure 2
- While lifting the screen up from the back case there will still be another connector that is attached and will need to be removed. This final connector has a small hinge that you must pull up and then it stays with the ribbon when you pull the connector out. The location of this connector is shown in figure 2.
- To remove the LCD you will need to lift up the ribbon cable that is held on with a piece of tape. This ribbon cable will come out with the LCD.
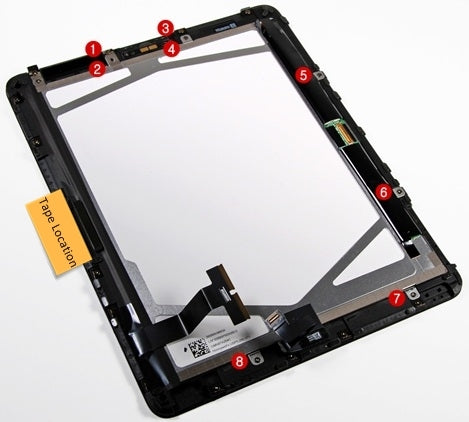
Figure 3
-
You will now have to remove 8 screws (T3) that are holding the LCD to the touch panel frame. The locations of these screws are mentioned in Figure 3. For the removal of these screws you will require a T3 Torx Screwdriver.
- When you have removed the screws and before you separate the LCD from the touch panel assembly there is a piece of tape that needs to be lifted up slightly in order to remove the LCD from the touch panel assembly. This tape can be located on the side that did not have any screws (refer to figure 3).
-
You are now able to gently pry up the LCD from the touch panel assembly. Using a small flathead screwdriver at each of the screw locations can help pry it up sometimes. You need to be careful in prying the LCD up as it is adhered around the edges.
Your iPad is now disassembled and ready for replacement of part(s). Reverse the instructions above to reassemble your iPad.
iPad Battery Replacement Guide
Using this repair guide from Repairs Universe you will be able to replace a old or faulty battery on your iPad. We walk you through each step of disassembling your tablet and performing a battery replacement, giving your iPad more charge and life!
This guide will help you to install the following iPad parts: iPad Battery Replacement
-
First of all take the iPad Opening tool available at Repairs Universe.com and slide it between the display screen of the iPad and the metal frame (aluminum frame) to pry up the screen on each side. This will release the tabs that hold the screen together. Beware that some of the clips (tabs) may break in the process, and you will need to replace them. You can greatly minimize the risk of damaging these clips during prying by using iPad Opening Tool which is specifically designed for this purpose. When prying off the screen you need to be careful not to pry near the Volume button, head phone port and Home button as you could damage these parts.
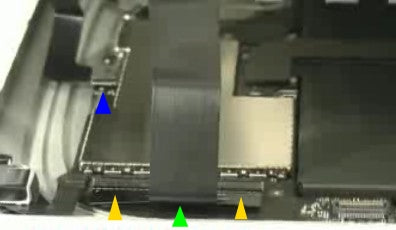
Figure 1
-
As you open the case you will need to release one of the ribbon cables that is connected to the board indicated by the green arrow-head in figure 1. Using a safe open pry tool you must flip up both locks (shown by the orange arrow-heads in figure 1) that hold the ribbon in place before you are able to slide the ribbon out.
-
You will then have to unplug the connector from the motherboard shown by the blue arrow-heads in figure1. It will be very easy to pull it up and off the motherboard. It is just like a plug and will pop right off.
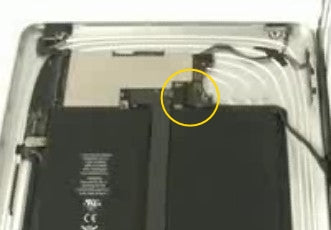
Figure 2
- While lifting the screen up from the back case there will still be another connector that is attached and will need to be removed. This final connector has a small hinge that you must pull up and then it stays with the ribbon when you pull the connector out. The location of this connector is shown in figure 2.
- To remove the LCD and screen assembly you will need to lift up the ribbon cable that is held on with a piece of tape. This ribbon cable will come out with the LCD.
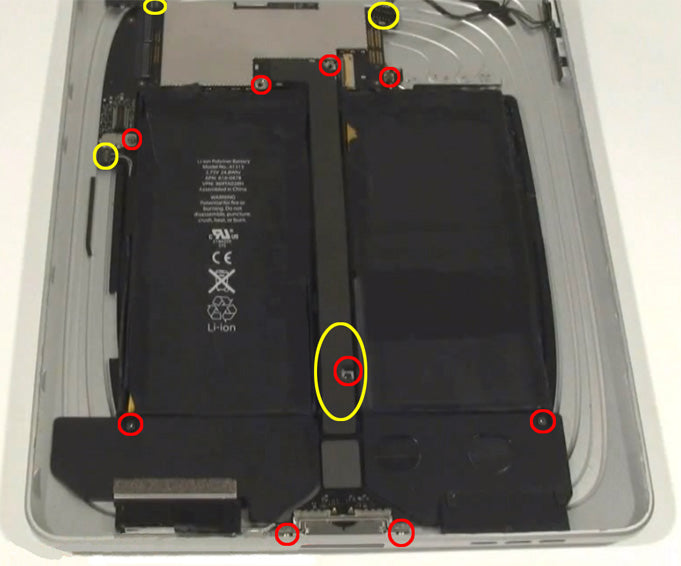
Figure 3
- With the screen removed we can now remove 8 Torx T3 screws as shown in figure 3. There will also be 3 connections on the upper motherboard that will need to be released as well.
- The large yellow circle located on figure 3 shows 2 antenna connections that need to be released which are located on the back side of the dock flex cable. Simple lift this cable away from the battery and release these cables.
- The motherboard can now be removed. The lower speaker assembly is next to be removed - release the adhesive on the two cables located on the left side. The speaker assembly can now easily be lifted leaving only the battery.
- To remove the battery, carefully lift the upper flex cables and pull the battery away from the housing. The battery can now be replaced.
Notice/Warning:
RepairsUniverse does not accept any liability for damage, or injury caused, while you are following our disassemble guides. We make no representations, warranties, or conditions of any kind, express or implied. Utilizing these guides to assist you in repairing your mobile devices will void your warranty. RepairsUniverse strictly prohibits altering or modifying our teardown guides for commercial use, reproduction, or publication