iPhone 4G Take Apart Repair Guide
February 24, 2019 | 0 Comments
|
|
Tweet |
 |
|
|
- View the downloadable version of our how to fix your iPhone 4 screen guide.
|
|---|
This take apart repair guide shows how to disassemble the iPhone 4G cell phone quickly and safely. This guide designed by the Repairs Universe team and can help you replace the battery, a cracked glass screen or damaged or faulty LCD screen.
This guide will help you to install the following iPhone 4G parts:
- iPhone 4G LCD Screen Replacement Display
- iPhone 4G Glass Touch Screen Digitizer Replacement - Black
- iPhone 4G Glass Touch Screen Digitizer Replacement - White
- iPhone 4G Battery Replacement
Tools Required:
- Safe Open Pry Tool
- Small Phillips Screwdriver
- Small Flathead Screwdriver
- SIM Removal Tool / Paper Clip
iPhone 4G Take apart guide:
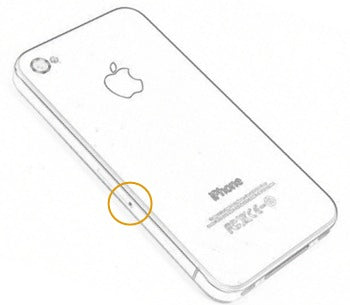
Figure 1
- First of all use a SIM Removal Tool to remove the SIM along with the SIM Tray from the unit. You need to insert the SIM Removal Tool into the pin-hole at the side of the phone (highlighted in the figure 1) and the tray will come out.
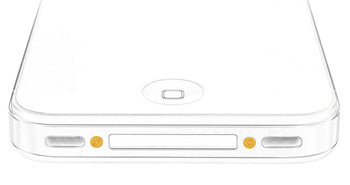
Figure 2
- Now remove the two Phillips screws from the bottom of the phone (as shown in figure 2) using a small Phillips Screwdriver. After the removal of these two screws you can take off the back cover (battery cover) of the phone. Just slide the back cover up a little bit and you will be able to take it off from the phone.

Figure 3
- In order to remove the battery, you will need to remove a Phillips screw first which is there to hold the battery connector in place. Remove the screw using a Phillips screwdriver and then carefully lift up the connector from the motherboard. The location of the connector is shown in figure 3 by the orange rectangle and the position of screw by small circle. Now remove the battery from the unit by pulling up the �plastic pull tab� and put it aside. The battery is glued in with adhesive and you may have to apply a little bit of force for to lift it up.
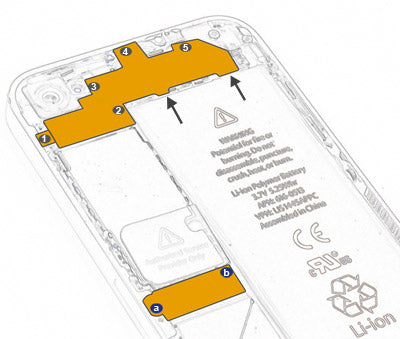
Figure 4
- The next step is to remove the two EMI shields. The locations of these shields are indicated in the figure 4. For the removal of the first shield located at the top of the phone, you will have to remove five screws using small Phillips screwdriver (the positions of screws on the shields are also indicated in the figure 4). Be careful when lifting the shield up after removing the screws because the shield is held in place with two hinges as shown by the two arrows in the figure 4. The shield loops into these hinges and therefore you will have to free the shield from these hinges as well.
- The removal of the second shield will require two Phillips screws (a and b) to be removed from the shield. And then you can easily lift up the shield and put it aside.
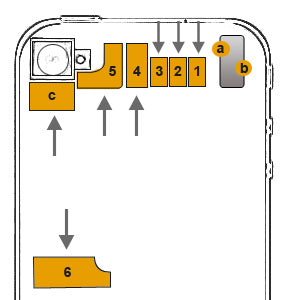
Figure 5
- The removal of the EMI shields will expose a number of connectors to be unplugged (lifted up) from the motherboard. Refer to figure 5 to find the locations of these connectors. Carefully lift up the connectors one by one using a safe open pry tool and these will easily pop up. The arrows in the figure 5 points to the directions for lifting up the connectors.
- Now remove the vibrating motor which requires only unscrewing of the two screws using Phillips Screwdriver. The locations of the vibrating motor (silver rectangle) and the screws (a and b) are also indicated in the figure 5.
- With the help of safe open pry tool gently lift up the connector (c) which connects the camera (refer to figure 5). Once the connector is lifted up, the camera can be easily removed.
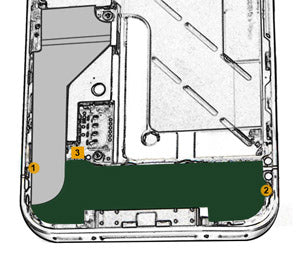
Figure 6
- Lift the ribbon cable (shown in gray color in figure 6) all the way up from the motherboard to expose one of the screws (shown as screw 1 in figure 6). Remove this screw as well as another screw (shown as screw 2 in above figure) on the speaker housing (shown in dark green color in the figure 6) ) using a Phillips screwdriver.
- After removing the screws on the speaker housing, gently loosen up and lift the speaker housing (shown in dark green color in the figure 6) but do not lift it up completely because it will still be connected to the motherboard through a speaker connector wire at point 3 in figure 6. Carefully lift this connector up using the safe open pry tool to release the speaker assembly and put it aside.
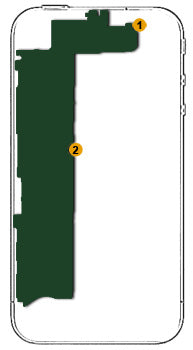
Figure 7
- In order to free the motherboard from the body of the phone, you will have to remove two more screws. The locations of these screws are shown by two small orange circles in the figure 7. You will have to use a flathead screwdriver to remove the screw number 1 and small Phillips screwdriver for screw number 2. Once you have the screws removed you can lift the motherboard up carefully and put it aside.
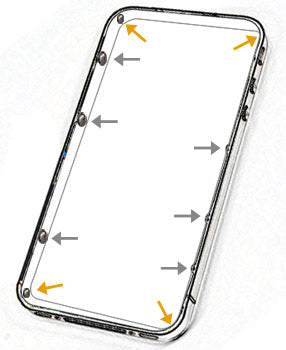
Figure 8
- The next step is to unscrew the ten screws from the sides and corners of the phone body. There will be 3 large screws each (with washers) on the two sides of the phone body and one small screw in each corner. The location of these screws is indicated in the above figure 7. The gray arrows indicate the locations of large screws while the orange arrows point to the locations of small screws.
- Once you have removed the 10 screws, you need to pry up the front panel of the unit using a safe open pry tool . Gently insert the pry tool in the edge between the screen and the metal frame and run it along the sides to loosen up the screen and then try to lift the screen upwards. Be careful while lifting the screen up because it will be adhered to the metal frame and also because you still have to run the ribbon cables through the frame before you will be able to completely separate the screen.
Your iPhone 4G is now disassembled and you can replace the damaged part(s) with new one. Reverse the instructions above to reassemble your phone.
Notice:
Repairs Universe's guides are for informational purposes only. Please click here for details.
Learn about restrictions on reproduction and re-use of Repairs Universe's repair/take-apart/installation guides, and about creating hyperlinks to our guides.
Author: Curt Halford