iPhone 5 Written Repair Guide
February 24, 2019 | 0 Comments
|
- View the downloadable version of our how to fix your iPhone 5 screen guide.
|
|---|
This repair guide is for the iPhone 5, showing you in detail how to replace and disassemble your full device. Using this guide will allow you to repair a damaged screen, dock port, or other internal components. The guide has been compiled by the Repairs Universe team and will insure a quick repair is made on your iPhone 5.
iPhone 5 Replacement Parts
- iPhone 5 LCD + Touch Screen Assembly - Black
- iPhone 5 LCD + Touch Screen Assembly - White
- iPhone 5 Dock Port & Headphone Jack
- iPhone 5 Power Button Flex
- And other iPhone 5 Parts
Tools Required:
iPhone 5 Take apart guide:
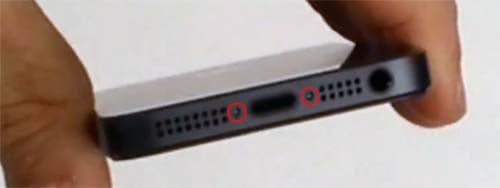
- The first step to taking apart the iPhone 5 will be to remove the 2 (two) iPhone Torx screws located on either side of the dock port as shown in figure 1.

Figure 1
- With the dock screws removed, use a suction cup and pry tool to gently lift the screen from the device. Do this from the bottom as the top still has cables attached.
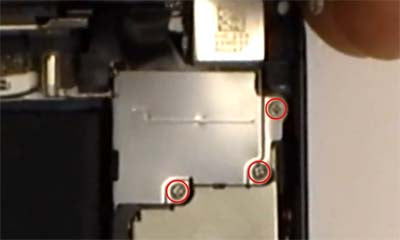
- Once the screen is lifted, remove the 3 (three) small phillips screws (as shown in figure 2) holding the metal cover over the screeen asseemblies flex cable. With the metal cover removed, release the 3 (three) pop connectors and remove the screen.

Figure 2
- The screen assembly can now be replaced.
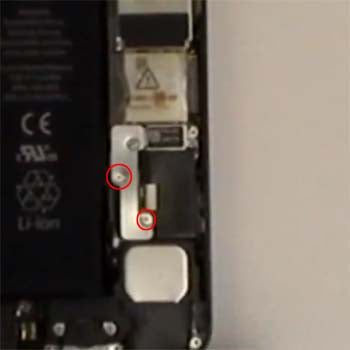
- To replace the battery, remove the two (2) small phillips screws as shown in figure 3. Once the screws are removed, use the clear pull tab to gently remove the battery from the device. Note it will be held in place with adhesive.

Figure 3
- In order to proceed any further in the disassembly, you will need to eject and remove the sim card. Use a paper clip to press inside the hole next to the sim card tray for it to be relesased.
- To remove the dock port you will need to remove the 7 (seven) small phillips screws located at the bottom of the device.You will now need to lift the flex cable running near the loud speaker away from the motherboard and release the 2 (two) connections located on the motherboard.Once the adhesive is released, you will be able to wiggle out the dock port and replace it.

Figure 4
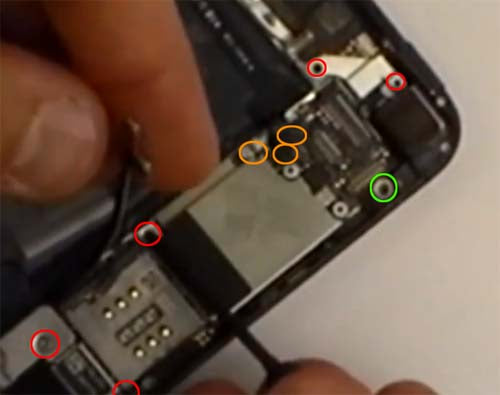
- To remove the motherboard we will need to remove all the screws shown in figure 5. There will aslo be 3 connections shown in orange that will need to be lifted. The green circle on figure 5 shows a screw needing a flat head to remove it. There will also be 2 (two) more of these on the lower section of the motherboard, near the dock port connector. Once all these have been removed, you can flip the motherboard to the left and remove 1 (one) more antena connector located on the underside of the motherboard. The logic board can then be fully removed.

Figure 5
- To replace the main camera, remove the 2 (two) phillips screws holding the flex cable in place. You can then release both the connections and fully remove the camera.
- If replacing the power button flex cable you will need to remove the 5 (five) screws located in figure 6. Once that is done, you will be able to release the adhesive holding the flex cable to the frame and replace.

Your iPhone 5 is now disassembled and you can replace the damaged part(s) with new one. Reverse the instructions above to reassemble your phone.
Notice:
Repairs Universe's guides are for informational purposes only. Please click here for details.
Learn about restrictions on reproduction and re-use of Repairs Universe's repair/take-apart/installation guides, and about creating hyperlinks to our guides.