LG Lucid 2 VS870 Repair Guide
June 4, 2018 | 0 Comments
This repair guide will show you how to tear down the LG Lucid 2 VS870 allowing you to perform repairs such as fixing a broken glass touch screen or LCD display. The Repairs Universe techs have compiled this written guide to assist you in your DIY repair. You can also watch our video tutorial for a visual demonstration while using the figures below to reference to while doing your repair.
This repair guide will help when needing to install the following LG Lucid 2 parts:
Required Repair Tools:
- Small Phillips Screwdriver
- Adhesive Strips
- Safe Open Pry Tool
- Heat Gun or Blow dryer for touch screen repairs
LG Lucid 2 Repair Guide:
How to Fix a LG Lucid 2 (Step-by-Step Tutorial) :
- First you will want to make sure your device is fully powered off before you begin.
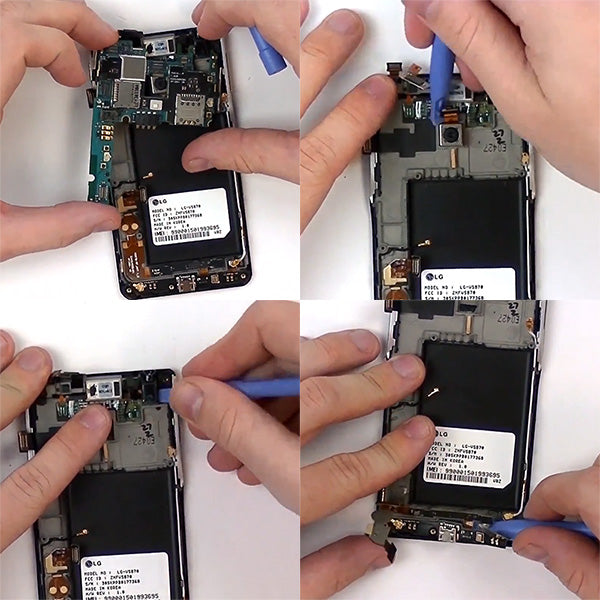
- Next you will need to remove the back cover, battery, micro SD card & SIM card
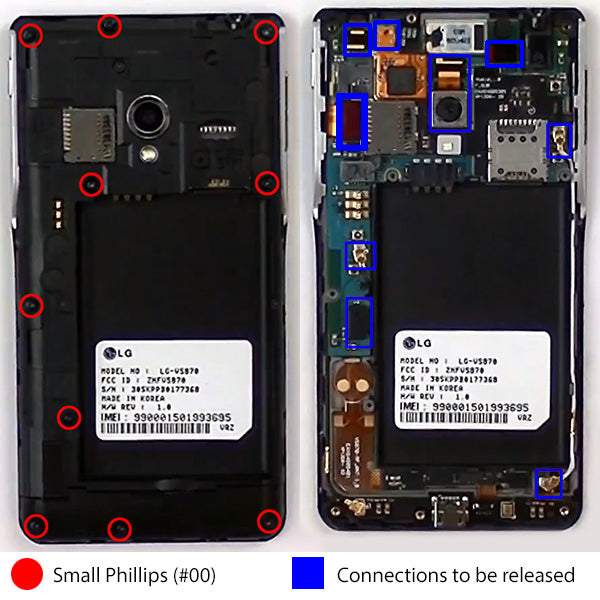
- Then taking your Small Phillips Screwdriver (#00) you will need to remove the ten (10) screws circled in the figure below
- With these screws removed you will then need to take your safe open pry tool and gently pry off the back housing by releasing the clips holding it in place. (Be careful not to damaged any of these clips or insert your pry tool too far deep into the device where you could potentially damage any components on the motherboard.
- With the back housing removed you will have six (6) pop-connectors and three (3) antenna cables to release from the motherboard.
See figure below for screw and connection locations.
- Once all screws and connections have been removed you may now use your pry tool to gently remove the motherboard from the housing. (Use caution when handling the motherboard.)
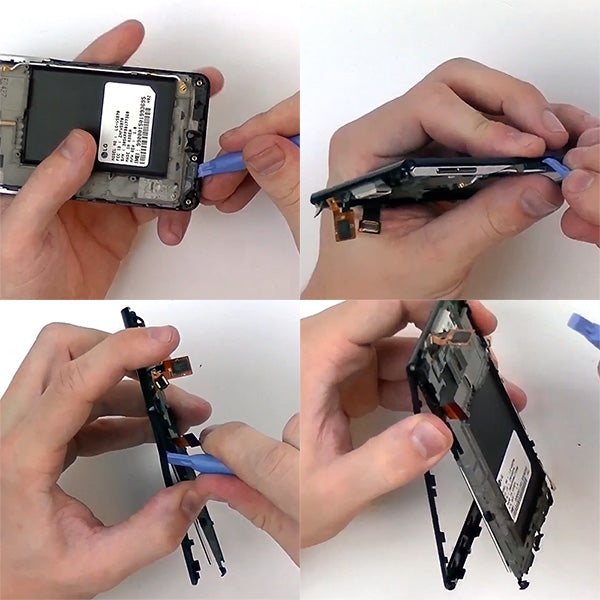
- Next you will need to take your pry tool and pry up the rear camera from then housing. The camera is held down with a little adhesive.
- You will also need to pry up the headphone jack assembly which is also held down with a little adhesive.
- Now take your pry tool and peel up the charging port flex assembly at the bottom of the device. Be careful not to damage this flex assembly when removing it from the housing. It is held down with some adhesive as well.
See figure below for reference.
- Next step you will need to take your pry tool to gently remove the mid frame from the front housing.
- Taking your plastic pry tool insert it between the front housing and mid-frame. Gently work your way around all edges of the housing to release the clips.
- You will find that the two silver housing pieces on each side of the device will be able to be removed separately along with the buttons themselves. Set those off to the side for re-assembly
- Once you have gotten to the point that the LCD and glass touch screen are separating you will want to keep the LCD with the mid-frame and not with the front housing and digitizer.
- You should have two separate parts. The LCD + mid-frame and the touch screen + front housing.
See figure below for reference.
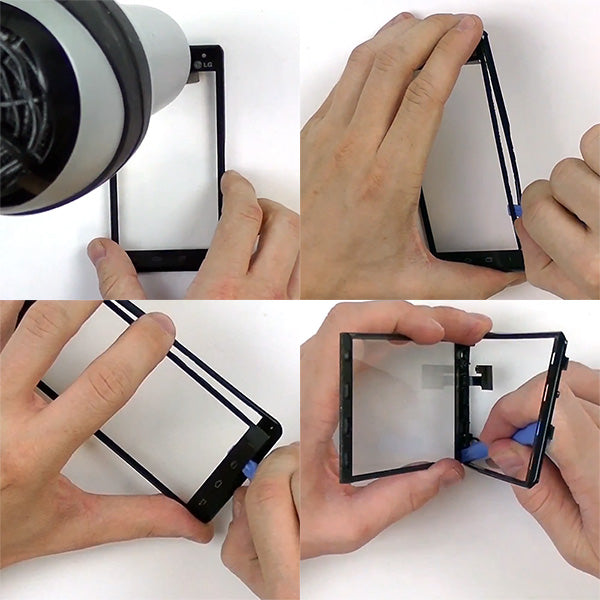
To replace the LCD screen you will want to use your pry tool to gently peel off the LCD's flex ribbon cable which is held onto the mid-frame with a little adhesive. Other wise you do not need to perform this step.
- Now taking your heat source you will want to apply a little amount of heat to the edges of the front housing to warm and release the adhesive holding it down to the inner bezel.
- Use a medium heat setting for 30-45 second intervals, although during the removal process you may need to apply more heat to stubborn areas.
- Take your plastic pry tool and begin by inserting the chisel end in between the seam of the housing and the glass digitizer to gently release it from the adhesive.
- You will need to slide the flex ribbon through the housing to completely remove it from the frame.
See figure below for reference.
Notice:
Repairs Universe's guides are for informational purposes only. Please click here for details.
Learn about restrictions on reproduction and re-use of Repairs Universe's repair/take-apart/installation guides, and about creating hyper links to our guides