Nokia N97 Take Apart Repair Guide
June 4, 2018 | 0 Comments
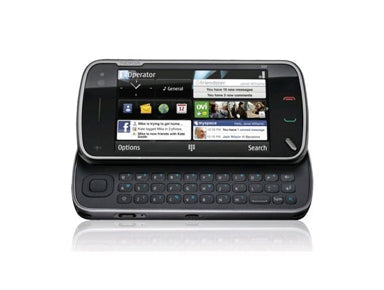
In this take apart guide we show how to disassemble the Nokia N97 cell phone quickly and safely. Following this step by step guide will enable you to install replacement parts to repair your Nokia N97 phone. This repair guide is designed and put together by the Repairs Universe team.
This guide will help you to install the following Nokia N97 part(s):
- Nokia N97 LCD Screen Replacement
Tools Required:
- Safe Open Pry Tool
- Premium Triangle Safe Open Pry Tool
- Small Phillips Screwdriver
- T4 Torx Screwdriver
Nokia N97 Take apart guide:
- In order to disassemble Nokia N97, first of all you need to remove the battery cover of the phone. Press the release tab at the bottom of the phone and take the cover off. Remove the battery from the phone as well.
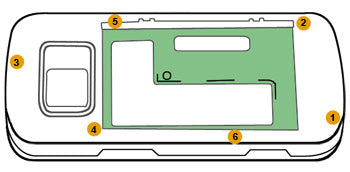
Figure 1
- The removal of the battery cover will expose six screws that need to be removed, at the locations shown in the figure 1. Unscrew these Torx screws with the help of a T4 Torx screwdriver in the order shown in figure 1.
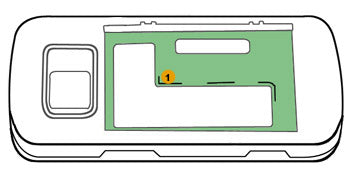
Figure 2
- Remove one more T4 screw at the location indicated in figure 2 using a T4 Torx screwdriver again.
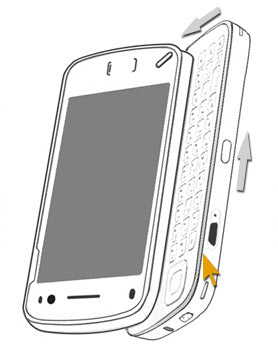
Figure 3
- You will now need to remove the lower part of the phone using a Triangle Safe Open Pry Tool. Open the slide and insert the tool between the edge (as indicated by the orange arrow in figure 3) to unclip the clips of the lower part. You need to slide the tool along the sides of the cover to unclip all the clips. Move the tool along the sides in the direction shown by gray arrows. Note that the lower part will still be connected to the unit by two connectors which need to be disconnected before it is completely released from the unit.
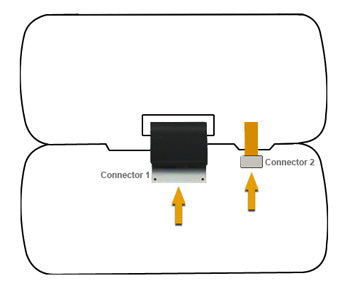
Figure 4
- Close the slide first and then gently lift up the upper part to access the connectors as shown in figure 4. Using a safe open pry tool, carefully open the two connectors at the locations shown in the figure. This will completely separate the lower part from the unit. Put it aside.
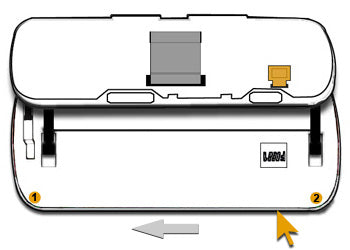
Figure 5
- Now open the slide again and remove the covers that cover the two Phillips screws as shown in figure 5. After removing the covers, remove both of these screws using a small Phillips screwdriver. The locations of the covers / screws are represented in figure 5 by two small orange circles 1 and 2.
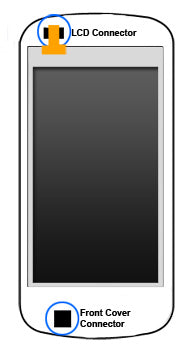
Figure 6
- Use triangle safe open pry tool to pry off the front cover of the phone. The orange arrow in figure 5 (previous figure) points to the edge for the use of the tool. Move the tool along the sides in the direction shown by the gray arrow and detach the front cover. When the cover is detached, carefully lift it up from one side because it is still connected with the unit through a connector. Using safe open pry tool, disconnect the connector and remove the front cover. The location of the connector is shown in the figure 6 highlighted in a blue circle (with the front cover removed).
- Now carefully loosen and lift up the LCD using safe open pry tool. But again note that in order to release the LCD from the unit you will need to disconnect the LCD connector first. Use safe open pry tool again to remove this connector from the location shown in the figure 6. This will release the LCD from the unit.
Your Nokia N97 is now disassembled and you can replace the damaged part(s) with new ones. Reverse the instructions above to reassemble your phone.
Notice:
Repairs Universe's guides are for informational purposes only. Please click here for details.
Learn about restrictions on reproduction and re-use of Repairs Universe's repair/take-apart/installation guides, and about creating hyperlinks to our guides.