HTC Flyer Video Repair Guide
June 4, 2018 | 0 Comments
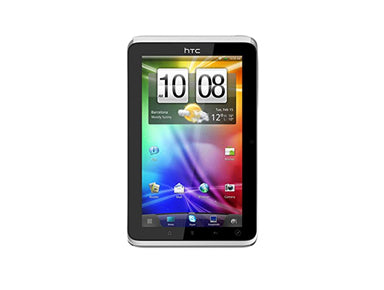
View the downloadable version of our how to fix your HTC Flyer screen guide.
Use this video repair guide from Repairs Universe to quickly and fully disassemble your HTC Flyer tablet. If you need to replace a screen or other internal component on your Flyer, use this take apart guide compiled by the Repairs Universe team to safely repair your tablet!
This guide will help you install the following HTC Flyer parts:
Tools Required:
- Safe open pry tool
- Torx T5 Screwdriver
- Adhesive Strips
- Hair Dryer/Heat Gun
HTC Flyer Video Repair Take Apart Guide:
Simply replace the damaged parts with the new ones and reverse the order to put your phone back together again.
Applying Adhesive to the Touch Screen Digitizer:
Simply replace the damaged parts with the new ones and reverse the order to put your phone back together again.
HTC Flyer Written Screen Repair Take Apart Guide:
- The first step to taking apart the Flyer is to pop off the top back cover by sliding the section up and away from the device.
- There will be four (4) Torx T5 screws that will need to be removed. Two hold in place the inner top cover and the other two hold the frame in place.
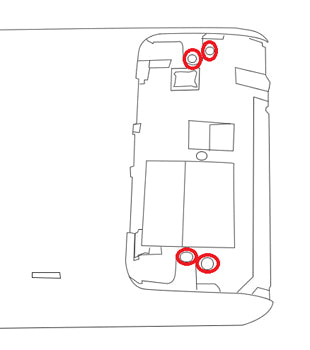
Figure 1
- The screen assembly can now be removed from the back cover.
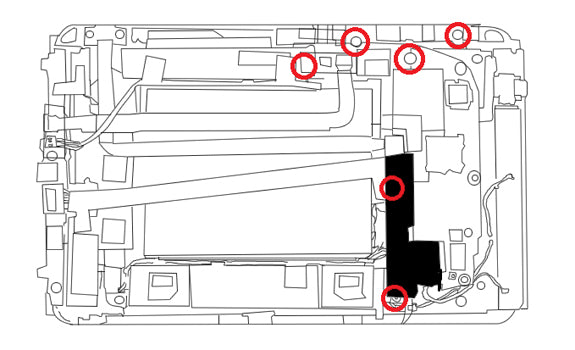
Figure 2
- All of the internal hardware is now accessible. Use a safe open pry tool to remove the tape that is covering the main connectors, as shown in Figure 2.
- Remove the six (6) Torx T5 screws holding the main board and volume button flex in place, as shown in Figure 2.
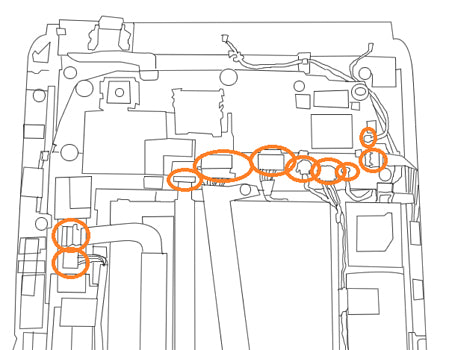
Figure 3
- Release the nine (9) flex cables as shown in Figure 3. Some are pop connections (antenna), others are clip (such as battery), and a few are jaw connections (lift the back clip and then release the cable).
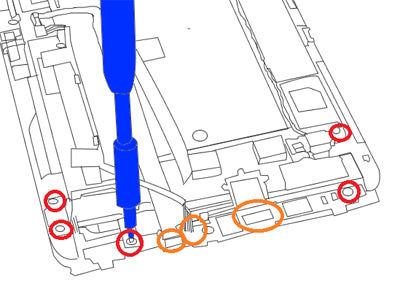
Figure 4
- On the lower side of the Flyer we have the USB circuit board. There will be two (2) Torx T5 screws and one (1) connection to be released which is the wire connection as shown in Figure 4.
- The lower board can now be removed.
- Remove the one (1) Torx screw holding the vibrate motor cover and speaker in place. With this removed, the full speaker/vibrate motor assembly can be removed from the device.
- On the main board, there will be silver tape covering the touch screen flex cable. Remove the tape and release the jaw connector. Remove the motherboard from the device.
- You can now heat the front of the touch screen using a heat gun or hair dryer on medium hate. Use quick movements around the outside edges for about 60 seconds. Now, using a safe open pry tool, pry between the front housing and touch screen to release the adhesive holding it in place. Reheat the touch screen if necessary.
- Carefully feed the touch screen flex cable through the housing and remove the touch screen digitizer from the Flyer.
Simply replace the damaged parts with the new ones and reverse the order to put your phone back together again.
Notice:
Repairs Universe's guides are for informational purposes only. Please click here for details.
Learn about restrictions on reproduction and re-use of Repairs Universe's repair/take-apart/installation guides, and about creating hyperlinks to our guides.
