G1 Google Phone Take Apart Repair Guide
June 4, 2018 | 0 Comments
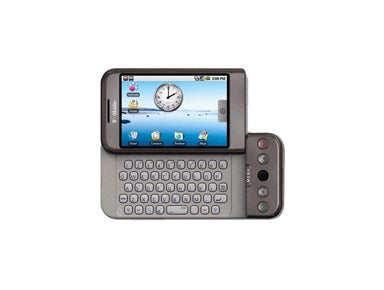
Our take apart repair guide shows how to disassemble the HTC-T Mobile G1 Google cell phone quickly and safely. This guide designed by the Repairs Universe team.
This repair disassembly guide will help you to install the following HTC T-Mobile G1 Google parts:
- HTC T-Mobile G1 Google Lcd Screen Replacement Display
- HTC T-Mobile G1 Google Touch Screen Digitizer Replacement
Tools Required:
HTC T-Mobile G1 Google Take apart guide:
- First of all remove the battery cover (back cover) of the phone. And then remove the battery, memory card and the SIM card.
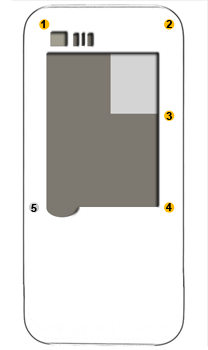
Figure 1
- This will expose the five screws that need to be removed. The locations of these screws are indicated in the figure 1. Four of these screws are Torx 5 screws highlighted in orange color in the figure 1 and one of these is a Torx 6 screw shown in gray color. Remove these screws using their respective screwdrivers.
- You are now required to remove the back frame / battery compartment. Insert the safe open pry tool into the gap between the frame and the body of the phone and pry up the frame to release the connecting hooks.
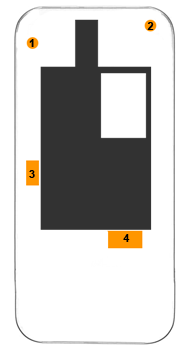
Figure 2
- The next step is to remove the two screws which are located at the top of the phone as shown in the figure 2. Then unplug the two coaxial cables at points 3 and 4 indicated in the above figure by small rectangles. After removing the cables, put these aside.
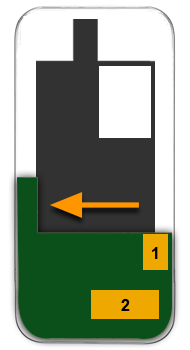
Figure 3
- You will now have to detach the two flex cables from the connectors at the locations shown in the figure 3. For the first cable, lift the hinge and slide the cable out, be careful not to snap it as this is a thin cable. For the second cable you need to peel off the orange tape first and then unplug it from the connector. Now push the green circuit board at the bottom of the phone in the direction indicated by the arrow in the figure above. You will feel a gentle click. This is to disconnect the camera FPC.
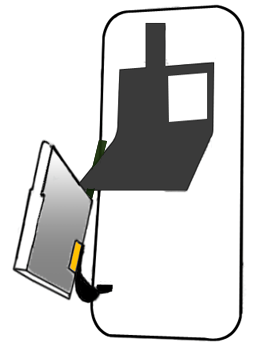
Figure 4
- Now disconnect two more ribbon cable connectors which are under the main board at the locations indicated in the figure 4 by an orange rectangle. In order to do this you need to lift up the main board from the right as shown in the figure above and then disconnect the cables. These cables will be covered with some sort of tape or a foil which should be removed first to access the connectors.
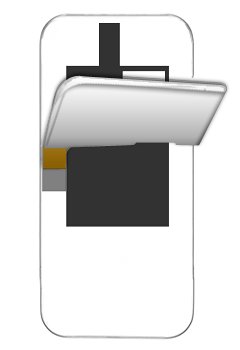
Figure 5
- The next step is to free the main board from the body of the phone. In order to achieve that you will be required to disconnect another ribbon cable which will be covered by an orange tape (refer to the figure 5 to see the location of this connector and how to access it). First of all peel off the tape, flip the latch upwards and then slide out the ribbon cable.
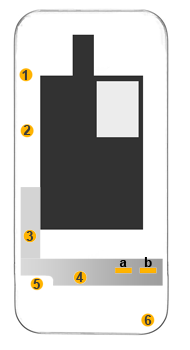
Figure 6
- Once you have separated the main board, you will now have to remove six screws using the Phillips screwdriver. The figure 6 shows the locations of these screws. The four screws shown in the figure as 1, 2, 3 and 4 are smaller ones while screw number 5 and 6 will be larger. In order to release the phone UI (user interface) piece on the other side of the phone you need to push a flat tool into the two gaps highlighted in the figure 6 by two orange rectangles a and b.
- Pry off the user interface part of the phone using the safe open pry tool. It will now be easy to separate the screen of the phone as you have already removed the screws on the other side. Just lift it up and it should come out. But be careful not to snap its flex cable.
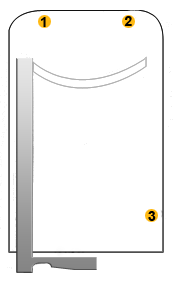
Figure 7
- In the next step you will have to remove four more Phillips screws from the back cover of the LCD screen using small Phillips screwdriver, refer to the above figure to find the locations of the screws. Note that the screws number 1 and 2 in the figure will be smaller while the other two screws will be larger. Also note that, the above figure does not show the location of the screw number 4, this is because it is located under the slider (on the left side and parallel to the screw 3), you will have to first move the slider to the right to access the screw number 4.
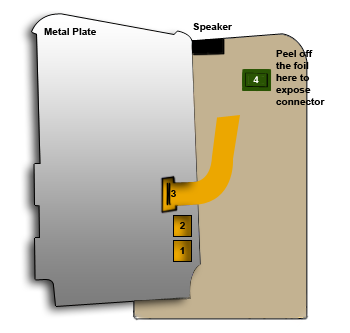
Figure 8
- Using the safe open pry tool, pry up the back cover of the phone screen and then lift the metal plate up from the right. Be careful while lifting this plate up because it will be connected with 3 ribbon cables at the left (refer to figure 8).
- When you have the metal plate lifted to a vertical position, you will be able to find the three ribbon cables mentioned in the figure 8 at points 1, 2 and 3. The two of the ribbons will be very easy to separate by just lifting up. The third flex cable (orange colored) has its other end connected to LCD will require a little bit more work. To separate this cable from the metal plate you will have to peel off the orange tape, pry up the latch and then slide out the cable. After the removal of the three ribbon cables you can separate the metal plate and put it aside.
- Now you need to carefully peel off the foil to disconnect another flex cable underneath. The location of the foil and the cable connector is highlighted in the figure 8. Be careful while removing this foil / tape to avoid snapping the cable underneath it.
- After you have removed the foil you can go ahead and separate this last flex cable to free the LCD. But before lifting up the LCD, you need to remove the speaker. The speaker location is mentioned in the figure 8.
- You can now remove the LCD by prying it up from the top and then sliding it out in the upward direction.
Your T-Mobile G1 phone is now disassembled. Reverse the instructions above to reassemble your phone.
Notice:
Repairs Universe's guides are for informational purposes only. Please click here for details.
Learn about restrictions on reproduction and re-use of Repairs Universe's repair/take-apart/installation guides, and about creating hyperlinks to our guides.

leave a comment
Your email address will not be published. Required fields are marked *