iPod Shuffle 2nd Generation Take Apart Repair Guide
June 4, 2018 | 0 Comments
In this guide the Repairs Universe team shows how to take apart and disassemble the iPod Shuffle 2nd Generation quickly and safely enabling you to make repairs such as installing a battery replacement.
This guide will help you to install the following iPod Shuffle 2nd Generation part(s):
Tools Required:
- Safe Open Pry Tool
- Small Phillips Screwdriver
- Hair-Dryer (optional)
iPod Shuffle 2nd Generation Take apart guide:
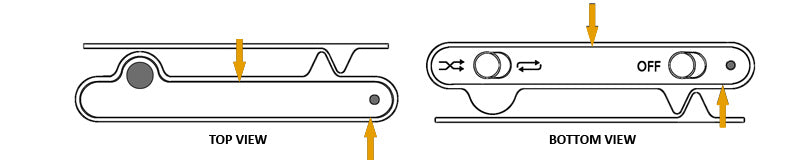
Figure 1
- To disassemble iPod shuffle 2nd Generation, first of all you need to remove the top and the bottom bezels as indicated in figure 1. Use Safe Open Pry Tool to pop these plastic bezels off. Note that these plastic bezels will be held in place with some adhesive. You may find it easier to heat it first using a hair-dryer to pry these off conveniently. Insert safe open pry tool in the edges as indicated in the figure 1 but be careful as these plastic bezels are thin and you should not pry the metal plate beneath the bezels.
- Now remove the "Shuffle" and "Power" switch from the iPod bottom.
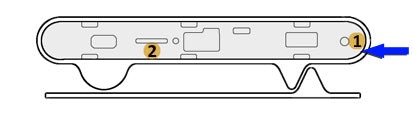
Figure 2
- Once you have the top and the bottom bezels removed from the iPod. There will be two small Phillips screws exposed at the top and two screws at the bottom. Use small Phillips screws to unscrew these 4 screws. Figure 2 shows the locations of the screws at the bottom of iPod.
- With the screws removed, you will now need to carefully lift up and remove the metal frames using a safe open pry tool from the top as well as bottom. It is recommended to start off from the side indicated by blue arrow in figure 2.
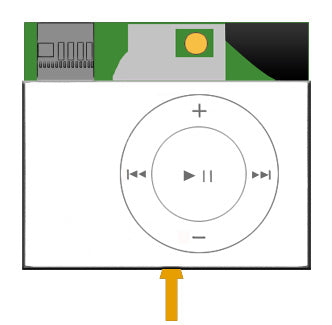
Figure 3
- Now in order to remove the mainboard from the iPod casing you need to push it from the bottom and through the casing with a help of a safe open pry tool as indicated by the arrow in figure 3.
- The main board and the battery will slide out of the casing as a single unit (battery will be soldered to the mainboard). But you can lift it from one side and turn it over. In order to remove / separate the battery from the mainboard you will need to de-solder it from the mainboard.
iPod Shuffle 2nd Generation is now disassembled and you can replace the damaged part(s) with new ones. Reverse the instructions above to reassemble your iPod.
Notice:
Repairs Universe's guides are for informational purposes only. Please click here for details.
Learn about restrictions on reproduction and re-use of Repairs Universe's repair/take-apart/installation guides, and about creating hyperlinks to our guides.