Motorola Droid A855 Video Repair Guide
June 4, 2018 | 0 Comments
View the downloadable version of our how to fix your Motorola Droid A855 screen guide.
This is a video repair guide for the Motorola Droid A855. This guide will go in depth on how to safely disassemble and repair your phone. Following this step by step guide will allow you to replace many internal parts for repair including the touch screen digitizer, LCD screen, flex ribbon cable, and other internal parts.
This guide will help you to install the following Motorola Droid A855 parts:
- Motorola Droid A855 Glass Touch Screen Digitizer Replacement
- Motorola Droid A855 LCD Screen Replacement
- Motorola Droid A855 Flex Ribbon Cable Replacement
- Other Motorola Droid A855 Replacement Parts
Tools Required:
Motorola Droid A855 Screen Replacement Video Guide:
We recommend fully watching the video before starting the repair, and then pausing / rewinding and reviewing when needed.
Reverse the instructions above to reassemble your iPod.
Applying Adhesive to the Touch Screen Digitizer:
Motorola Droid A855 Touch Screen Digitizer Replacement Summary:
Using this summary in correlation with the video will insure proper instructions are given and a safe repair is made.
- First remove the back cover and the battery from the phone. Using a safe pry tool remove the two plastic covers. Still using the safe pry tool, remove the ribbon from the bottom of the phone. Using a T5 Torx screw driver, remove the screws.
- Once the screws have been removed, use a safe pry tool and run along the sides of the phone to release the back frame from the rest of the phone. Another clip in the middle of the phone that needs to be released.
- Remove the back frame from the phone. Remove the 3 buttons; they will already come out when you remove the frame. Remove the speaker�s .Using fingers pop off the antennae cable. Using T5 Torx screw driver remove the 2 screws.
- Using the safe pry tool remove the pop connector clip. Then remove the cable which in on beneath. Using the safe pry tool release the plastic covering on beneath there will be a Torx 5 screw. Remove the screw.
- Lift the motherboard to the side; be careful as it is connected to the motherboard. Using a safe pry tool, release the pop ribbon cable and you can now release the motherboard from the rest of the phone.
- Release the small ribbon pop connector from the bottom left of the phone. Remove the sticker from the phone, allowing you to remove the back casing release. Remove all small Philips screws from the back of the metal plate. Slide it to the other side and remove the remaining small Philip screws.
- Once the screws are removed gently lift of the metal at the top of the phone and release the jaw clip to release the digitizer ribbon cable. Do the same for the LCD ribbon cable. Release the LCD ribbon cable; be careful as there is another ribbon cable still connected.
- Release the digitizer cable from the jaw connector. Gently lift up the rest of the flex ribbon cable. Using a safe pry tool gently lift the LCD screen from the rest of the phone. To remove a broken touch screen digitizer from the frame use a safe pry tool starting at the sides and run it along.
- Do it until you remove the glass from the frame. Gently ease the ribbon cable from the small gap and then remove the digitizer from the frame. You are now ready to install the new digitizer.
Motorola Droid A855 Written Take apart guide:
- First of all take off the battery cover of the phone and then remove the battery and the microSD card from the phone.
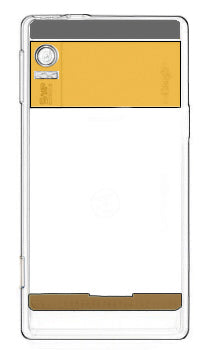
Figure 1
- Now you will need to remove a thin plastic piece (highlighted with orange color in figure 1) using safe open pry tool . This plastic piece is located just above the battery compartment and bears the �Google� label on one side and covers the camera lens on the other side.
- You will now have to remove another thin plastic piece (which is more like a plastic strip) from the top of the phone. This is shown in figure 1 in gray color. Use safe open pry tool again to remove this strip. Be careful while removing these plastic pieces to avoid any damage to these.
- To uncover the remaining screws, remove a thin copper strip at the bottom of the battery compartment (shown in brown color in figure 1). You can easily pry it up using a safe open pry tool.
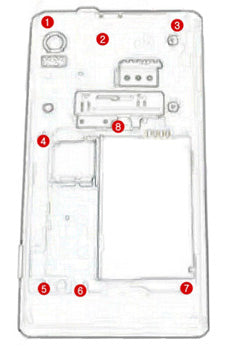
Figure 2
- The removal of the above-mentioned plastic pieces and strips will expose eight T5 screws. The locations of these screws are shown in figure 2. Remove these screws using a T5 Torx screwdriver.
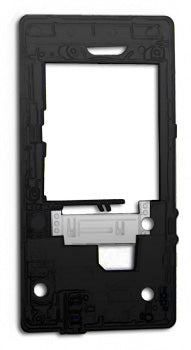
Figure 3
- The next step is to remove the back frame from the body of the phone, you need to pry it up using a safe open pry tool. Run the pry tool along the edges to unhook the connections and then take it off from the unit. The removed frame is shown in figure 3.
- You will now have to remove the speaker module from the bottom of the unit. Just lift it off and put it aside.
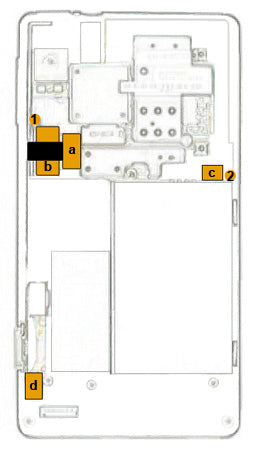
Figure 4
- In order to remove the motherboard from the body of the phone you will first of all have to unscrew two screws. The two small orange circles in figure 4 indicate the locations of these screws.
- Unplug two ribbon cables from the motherboard. The positions of the ribbon cable connectors are indicated in the figure 4 by two orange rectangles 'a' and 'b'.
- Now carefully unplug the antenna cable from the connector on motherboard shown in the figure by rectangle 'c'. Just carefully pull it up and it will pop out easily.
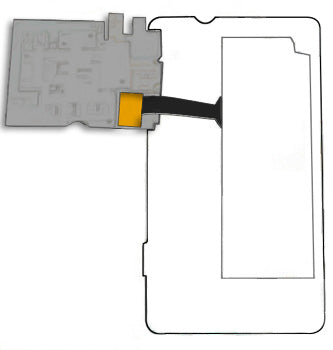
Figure 5
- Once you have removed the two screws, two ribbon cables and the antenna cable mentioned in the above 3 steps, you can lift the motherboard from one side as shown in the figure 5. But be careful because you still have to remove another ribbon cable which is attached to the motherboard. The small orange rectangle in Figure 5 shows the location of this connector. Pull the ribbon cable up from the connector to unplug it and to release the motherboard from the body of the phone.
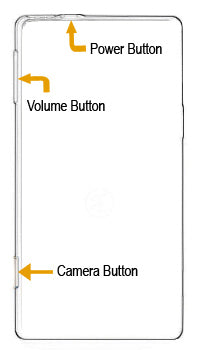
Figure 6
- Remove the �Power� button, �Volume� button and the �Camera� button from the unit.
- Unplug another ribbon cable from the connector located at the bottom left corner of the phone. The location of this connector is shown in the figure 4 as rectangle 'd'.
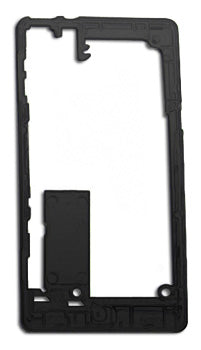
Figure 7
- Now pry up the top frame using safe open pry tool. Run the safe open pry tool along the edges to unhook the connections and release the frame. Figure 7 shows the frame removed from the unit.
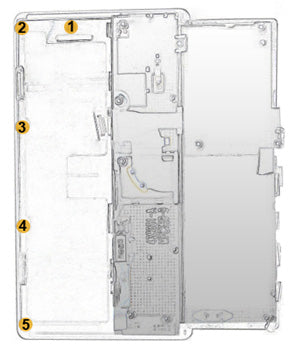
Figure 8
- Once you have separated the frame, you will need to remove 5 screws using a small Phillips screwdriver. But remember to keep the slider in the open position to access the screws. Refer to figure 8 for the locations of these screws.
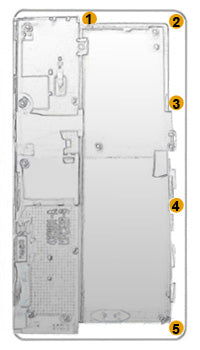
Figure 9
- You will now have to remove five more Phillips screws but to access these screws you need to slide the screen back and push it further past the point where it should normally stops. This is now possible due to the removal of the five screws in the last step. Remove the screws from the edge of this side as well. You may need to move the slider a little bit to get access for some of the screws. Figure 9 highlights the locations of these screws.
- After the removal of all the screws, the frame holding the screen and touch panel will be separated. Now gently lift the slider and the keyboard up from one side but be careful as this is still connected to the screen from underneath with a ribbon cable. Unplug this ribbon cable to separate the screen. You can now take the screen out of the assembly.
Your Motorola Droid A855 is now disassembled and you can replace the damaged part(s) with new ones. Reverse the instructions above to reassemble your phone.
Notice:
Repairs Universe's guides are for informational purposes only. Please click here for details.
Learn about restrictions on reproduction and re-use of Repairs Universe's repair/take-apart/installation guides, and about creating hyperlinks to our guides.