Motorola Moto X Repair Guide
June 4, 2018 | 0 Comments

This Motorola Moto X take apart repair guide is proudly brought to you by Repairs Universe. If you need to replace a broken or cracked screen on your new Moto X you may use this repair guide as a quick and easy reference to see the step by step process the replace the screen assembly as well as any other internal components you may need to replace.
This guide will help you to install the following Moto X parts:
- Moto X LCD + Touch Screen Digitizer Assembly
- Other Internal Components
Tools Required:
- T4 Torx Screwdriver
- Safe Open Pry Tool
- Sim Card Removal Tool
Moto X Repair Guide:
How to Fix a Motorola Moto X (Step-by-Step Guide) :
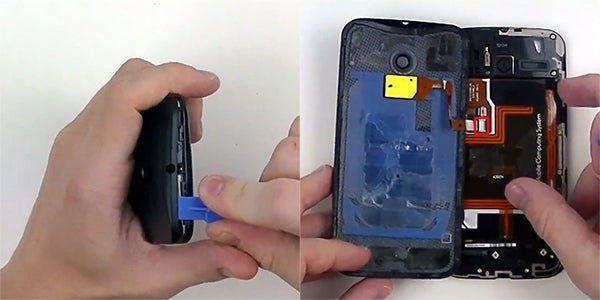
- You want to begin by removing the sim card and sim card tray on the side of the device using the sim card tray removal tool provided in the box from Motorola or a paper clip to release the tray.
- Next Begin using your safe open pry tool to release the clips holding the back cover to the device.
- You'll want to be very careful on the side of the device where the volume buttons are located so you do not rip or tear their flex ribbon connector.
- Once you have enough of the clips and adhesive removed from the back cover you will want to flip it over to the left side of the device very carefully as there is a flex ribbon connection on the back cover.
- You will now need to release the jaw bone connection shown in the figure below to completely remove the back cover.
See figure below for reference.
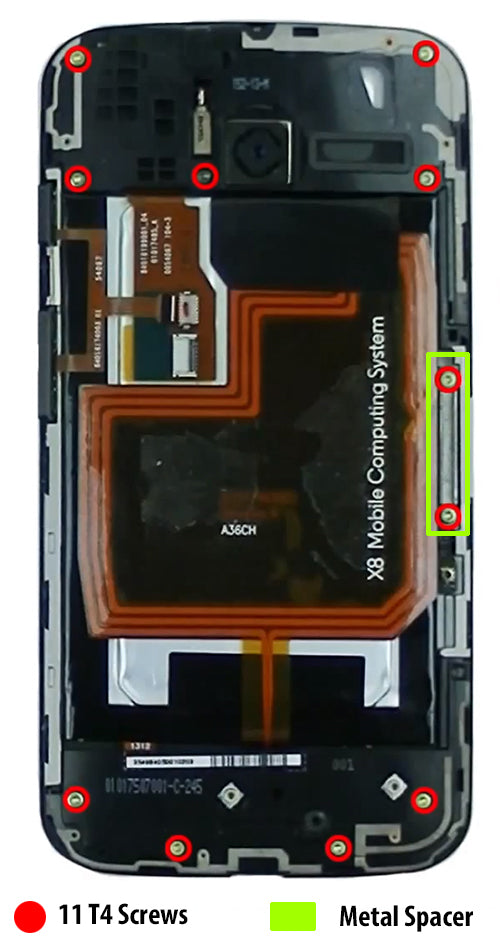
- Next taking your T4 Torx Screwdriver remove the (11) T4 screws circled in RED in the figure below.
- Also, highlighted in GREEN is a metal spacer that can be removed and set to the side for re-assembly.
- 3.1 In this step you will need to take your pry tool to gently release their clips to remove the upper housing that holds the audio jack and loud speaker assembly.
- 3.2 Note the right side of this housing may require extra care as it is held on with clips in the housing and can be flimsy.
- 3.3 - 3.4 Take your safe open pry tool and remove the lower housing shown in the figure below being careful not to damage any of the clips holding it in place.
See figure below for reference.

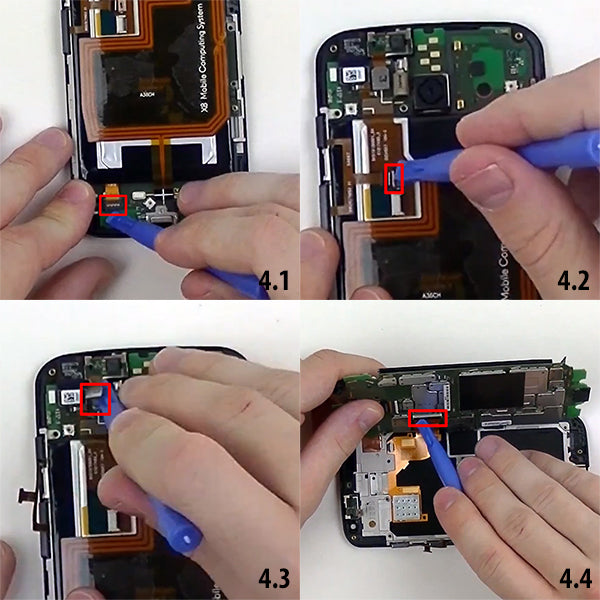
- 4.1 Release the battery connection using your plastic pry tool.
- 4.2 Release the volume button flex by releasing the jaw connection.
- 4.3 Next using your plastic pry tool to release the Pop connector for the upper sensor & ear speaker assembly.
- 4.4 From here you should be able to carefully flip over the motherboard exposing the jaw-bone connection shown in the figure below. Release the connection to be able to completely remove the motherboard and battery.
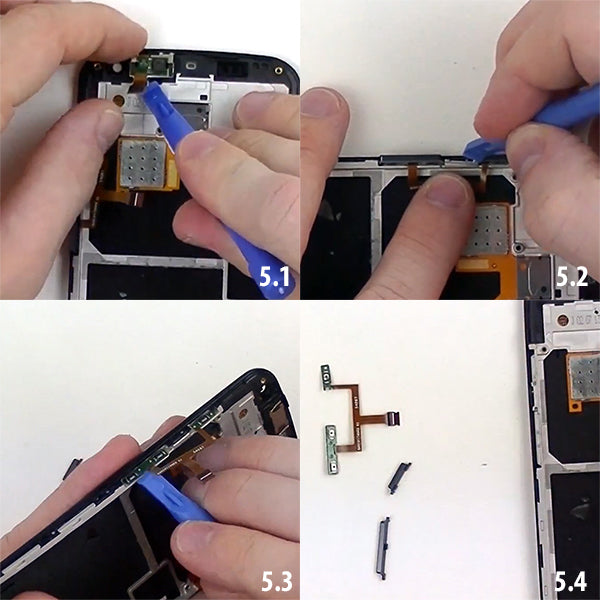
- 5.1 Using your plastic pry tool gently remove the upper sensor assembly. You will notice underneath this sensor is the ear speaker still attached to the housing.
- 5.2 Use your pry tool to remove this metal clip covering the volume button flex cable.
- 5.3 From here you will be able to pull out the volume and power buttons quite easily. Next peel off the volume buttons using your plastic pry tool or a set of plastic tweezers. Be careful not to rip or tear this ribbon cable.
- 5.4 Set the buttons and volume flex ribbon cable to the side for re-assembly.
See figure below for reference.
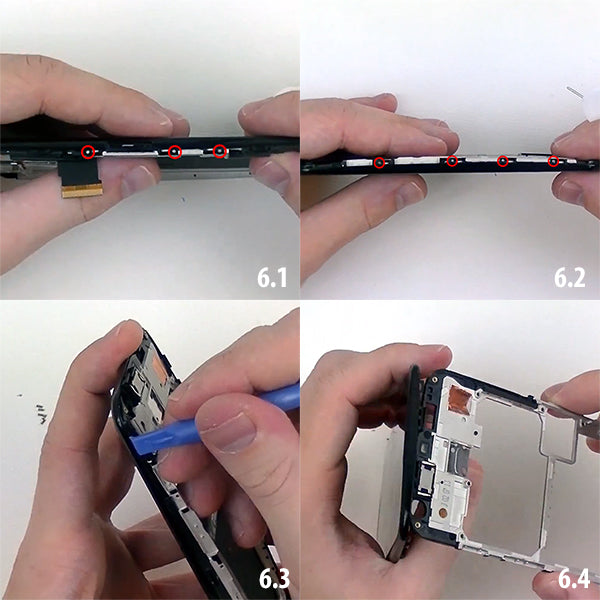
On each side of the screen assembly/housing you will notice (7) small pins holding the housing to the screen assembly.
- 6.1 - 6.2 Using the Sim card removal tool provided by Motorola push the (7) small pins out by pushing from the inside of the housing.
- 6.3 Once all of the pins have been removed from the housing take your safe open pry tool and release the Grey housing from the screen assembly. Be careful not to break any of the clips that hold this housing in place.
- 6.4 After all of the housing has been released from the screen assembly you should be able to remove it completely.
See figure below for reference.
From here you should now be able to re-assemble your Moto X using your brand new LCD + Touch Screen assembly by reversing the steps above.
Notice/Warning:
RepairsUniverse does not accept any liability for damage, or injury caused, while you are following our disassemble guides. We make no representations, warranties, or conditions of any kind, express or implied. Utilizing these guides to assist you in repairing your mobile devices will void your warranty. RepairsUniverse strictly prohibits altering or modifying our teardown guides for commercial use, reproduction, or publication