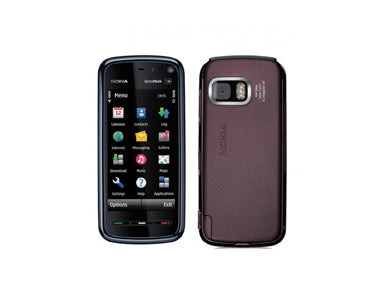
Nokia 5800 Xpress Music LCD Screen Replacement Repair Instructions
June 4, 2018 | 0 Comments
This guide is will help you install the following parts:
- Nokia 5800 Xpress Music LCD Screen
Tools required:
Nokia 5800 Xpress Music LCD Screen Install
- First thing you need to do is remove the back cover, battery, sim, stylus and memory card. Once done remove the four screws. Then using a safe pry tool pull the colored outer band out to release the clips which are holding the band in place.
- You will notice the he key lock sliding button will also come away when you release the colored band.
-
Using the safe pry tool, release the clips on the front cover around its outer edge the same way you released the colored band. We recommend you start near the bottom as there is a ribbon cable at the top of the phone which can be damaged if too much force is applied.
- You should now be able to lift the front cover up but be careful as it is still attached by a ribbon cable at the top of the phone.
- Using the safe pry tool lever the keypad off. Place the pry tool under the keypad and pry it off.
- Still using the pry tool place it under the LCD screen. It should come away with little force. It may be held in place with a little adhesive. Lift the LCD up and over so it sits on top of the front cover. Like the front cover it is attached by ribbons so it can't be removed completely yet.
- Remove the two screws you can see which were under the LCD screen and the battery compartment will come loose.
- Turn the phone over and remove the battery compartment. Flip the LCD screen and front cover back so not to cause any stress on the ribbons. With the front of the phone face down, you will see a ribbon on the bottom left connecting to the underside of the motherboard. It has a pop connector. Just lever it away from the motherboard using the pry tool to disconnect it.
-
With the ribbon cable disconnected you can now lift the motherboard allowing you to access some the rest of the ribbon connectors. There are 3 connectors. Two of them are pop connectors. Again use your pry tool to disconnect these.
- The third connector is slightly different. This is a jaw connector. The brown part at the top of the jaw connector is a latch. Using the pry tool lift this up towards you. Once the jaw connector is open pull the mother board away from the rest of the phone and the ribbon will slide out.
- With the 3 ribbons disconnected the front cover, screen and main body of the phone will now be loose and can be separated.
- You can now replace the LCD screen. Reverse the whole procedure to put back together.
Notice:
Repairs Universe's guides are for informational purposes only. Please click here for details.
Learn about restrictions on reproduction and re-use of Repairs Universe's repair/take-apart/installation guides, and about creating hyperlinks to our guides.
leave a comment
Your email address will not be published. Required fields are marked *