Samsung Galaxy Note 8.0 Take Apart Repair Guide
June 4, 2018 | 0 Comments

Is the screen or other parts on your Samsung Galaxy Note not working correctly or become damaged? This repair guide from RepairsUniverse will walk you through the repair and allow you to safely and effectively replace a broken screen or any other internal components.
This guide will help you install the following Samsung Galaxy Note GT-N5110 part (s):
- Samsung Galaxy Note 8.0 Touch Screen Digitizer Replacement
- Samsung Galaxy Note 8.0 LCD Screen Replacement
- Samsung Galaxy Note 8.0 N5100 LCD Flex Cable Replacement
Required Tools:
Galaxy Note 8.0 N5110 Repair Guide:
How to fix a Samsung Galaxy Note (Step-by-Step Guide) :
- Begin your repair by powering off the device fully and removing the stylus pen.
- Now use your safe open pry tool to gently pry in between the seam of the back cover and the frame. Using some pressure you will be able to release a few of the clips and begin working your way around the outside edges, releasing the back cover.
- After a few minutes of light prying you should be able to fully remove the back cover from the device.
- You now have full access to the motherboard, speaker,s battery, headphone jack, flex, cables and much more.
- The first step to take is fully disconnect its power supply (the battery). To do this, remove the eight (8) small Phillips screws located around the perimeter of the battery (Figure 1). With all the screws removed you can now lift the pop connector and remove the battery.
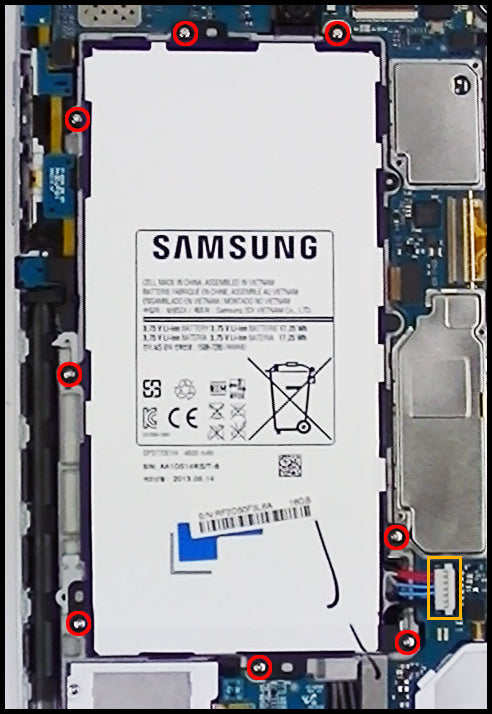
Figure 1
- With the battery removed you can now begin disassembling the internal components. Starting at the top left we will need to remove three (3) small Phillips screws. You will then need to disconnect the top five (5) connections from the motherboard.
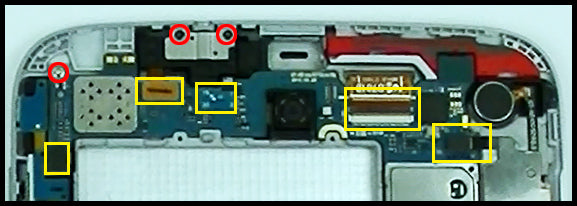
Figure 2
- On the lower half of the Note there will be six (6) more small Phillips screws that will need to be removed. With the screws removed you can then release the six (6) connectors on the motherboard. The highlighted yellow (filled) is a connector with a metal bracket on it. You will need to remove teh screw and then use a pry tool to lift the bracket before gaining access o the connector.
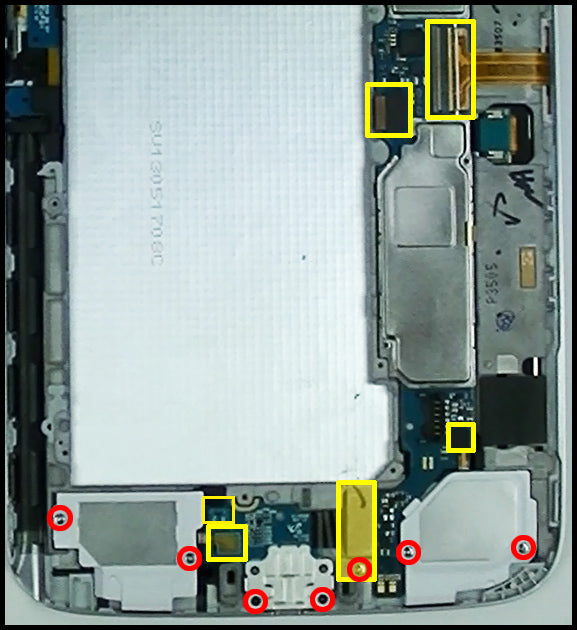
Figure 3
- The motherbaod can now be removed from the device. On the lower section you can also remove the two loud speakers and USB port flex cable.
- On the upper right side you will have the vibrate motor and memory card tray flex cable which can be removed using a pry tool.
- Finally, on the top left you can remove the button flex cable (with mic) which is held in with a small amount of adhesive and you will also be able to lift out the headphone jack and expose the front camera which can gently be removed.
- At this point all major parts have been removed from the frame. If you are replacing your screen you will need to heat the adhesive holding the touch screen and LCD into the housing. Do this with a heat gun or hair dryer on a medium setting and apply heat to the FRONT fo the device, heating all four sides. After about 45 seconds you can then test the adhesive strength using a pry tool and begin lifting the screen assembly away from the frame. If the adhesive is holding very strong, use more heat.
- Once the screen assemblies are able to be lifted, be cautious of the LCD and digitizer flex cables as they will need to be fed through the small slots in the housing.
- Take note of the home button flex cable/home button as well, as you do not want to overheat or damage this while prying your device.
- With the screens lifted from the frame you can now separate the screens using a heat gun or hair dryer and a pry tool. Apply 30 seconds worth of heat along the edges and gently begin separating the LCD from the touch screen on your Galaxy Note 8.0
Simply replace the damaged parts with the new ones and reverse the order to put your tablet back together again.
Applying Adhesive to the Touch Screen Digitizer:
Notice:
Repairs Universe's guides are for informational purposes only. Please click here for details.
Learn about restrictions on reproduction and re-use of Repairs Universe's repair/take-apart/installation guides, and about creating hyperlinks to our guides.