Samsung Galaxy S4 Mini Re-Assembly Repair Guide
June 4, 2018 | 0 Comments

Have you performed a repair on your Samsung Galaxy S4 Mini and now you need help to reassemble it? You're in luck! Here at Repairs Universe we realize it's not easy putting your device back together without convenient instructions. With that in mind we made this reassembly guide for the Samsung Galaxy S4 Mini. After you replace your touch screen digitizer, LCD screen, or vital internal component, use this guide to reassemble your device and have it working like new again!
This guide will assist you in the installation of these Samsung Galaxy S4 Mini part (s):
- Samsung Galaxy S4 Mini LCD + Touch Screen Assembly - Blue
- Samsung Galaxy S4 Mini LCD + Touch Screen Assembly - White
- Other Samsung Galaxy S4 Mini parts
Required Tools:
Samsung Galaxy S4 Mini Reassembly Guide:
How to Reassemble a Samsung Galaxy S4 Mini (Step-by-Step Guide):
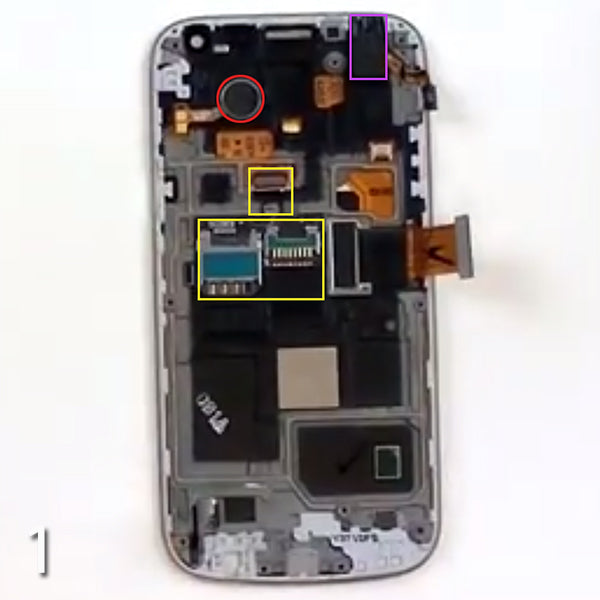
- To begin, there are several components to replace in the front housing (Figure 1).
- (Figure 1) The components include the headphone jack (highlighted in purple), vibrate motor (highlighted in red), and Sim card/Micro SD card flex cable (highlighted in yellow). After the Sim card/Micro SD card flex cable is replaced, insert the flex cable into the jaw connector (directly above the cable). Make sure the jaw flap is up and place the cable inside and lower the jaw connector (the upper yellow highlighted rectangle).
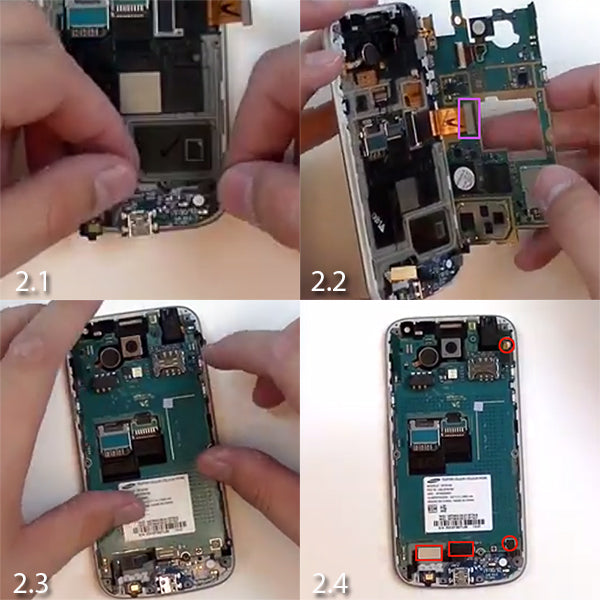
- Next replace the Dock Port flex cable (Figure 2.1). Line up the cable to ensure it is placed in the correct spot, and firmly place down on it, making sure the microphone on the left is reconnected.
- Now you will install the motherboard. To do this you will first reconnect the screen assembly flex cable to the back of the motherboard (highlighted in purple in Figure 2.2). Be sure the cable is securely fastened to the motherboard as this is an essential component to the device's functionality.
- After the cable is reconnected fold the moterboard back over in to place. During this step press in place all the flex cables and make sure the motherboard has a snug fit into the housing (Figure 2.3).
- With the motherboard back in place you now have four (4) connections to reconnect (all highlighted in red in Figure 2.4).
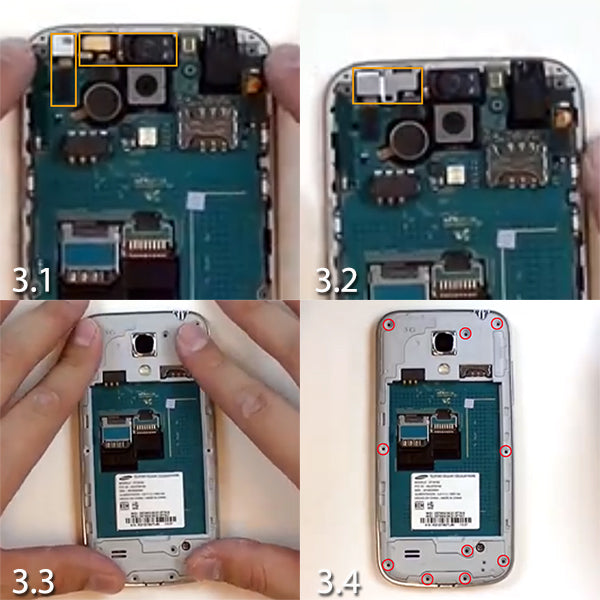
- The next component to be installed is the front camera (Figure 3.1). simply place it in it's socket, and press the flex cable firmly down. At this time you can also replace the ear speaker flex cable (also Figure 3.1).
- Replace the small metal bracket that covers the front camera and ear speaker flex cables (Figure 3.2).
- At this point you can install the back housing (Figure 3.3). Press it firmly on top of the the moherboard and it should snap right into place.
- Next you will use a Small Phillips Screwdriver and replace the ten (10) Small Phillips screws to secure the back housing (Figure 3.4).
- The last step will be to simply replace the battery and the back cover.
- Your device should now be reassembled and ready to work like new again!
Notice: Repairs Universe's guides are for informational purposes only. Please click here for details.
Learn about restrictions on reproduction and re-use of Repairs Universe's repair/take-apart/installation guides, and about creating hyperlinks to our guides