Samsung Galaxy Tab 7" Take Apart Repair Guide
June 4, 2018 | 0 Comments
View the downloadable version of our how to fix your Samsung Galaxy Tab P1000 screen guide.
Here the Repairs Universe team has put together a take apart repair guide showing how to disassemble the Samsung P1000 Galaxy Tab cell phone quickly and safely. This guide can assist with the installation of replacement parts.
This guide will help you to install the following Samsung P1000 Galaxy Tab part:
Tools Required:
- Safe Open Pry Tool
- Tri Wings Screwdriver
- Small Philips Screwdriver
- Adhesive Stips (For Touch Screen Digitizer Replacements)
Samsung P1000 Galaxy Tab Take apart guide:
- There are two screws at the bottom of the unit, and under two small plastic discs, use your small blade to remove this. With the discs remove you can use your tri wings screw drivers to remove the two screws as shown in Figure 1.
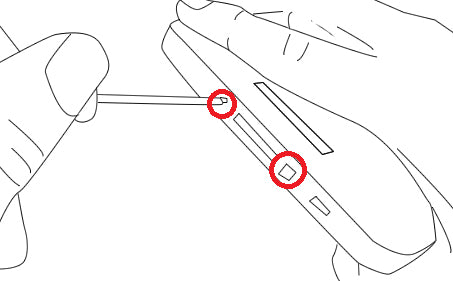
Figure 1
- Using your case opener tool begin to pry the back case of the unit be careful the buttons on the sides start from the bottom and work your way around.
- With the back case remove, you can now remove the battery, the battery is held to the motherboard with the single screw and the connector, use your Philip screw driver to remove the screw and your case opener tool to pry the connector free, and gently pull the battery from the unit.
- There are seven screws that you'll need to remove from the motherboard as shown in Figure 2. You can now remove the six ribbon connectors on the motherboard. These connectors for the back facing camera. After removing the connector gently pull up and the camera will come up as well.
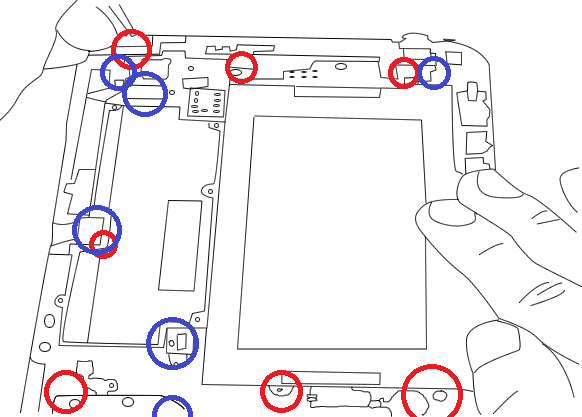
Figure 2
- These connectors for the back facing camera. After removing the connector gently pull up and the camera will come out as well. With the screws and connectors remove, you can now lift the motherboard from the unit.
- Carefully remove the ribbon cable for the LCD from the connector on the back of the screen assembly. Use your case opener tool to pull out the plastic tab.
- You can now apply heat to the outside edges (front of device). We suggest using a heat gun or hair dryer. 30 seconds to a minute is all you will need to loosen the adhesive. Immediately use a safe open pry tool on the outside edges of the screen and the housing. Re-heat if necessary.
- Remove the housing from the screen assembly. You can now use a safe open pry tool to release the touch screen from the LCD screen. Apply heat if needed.
- Your Samsung Galaxy Tab P1000 is now disassembled and the appropriate parts can be replaced.
- To reassemble, follow this guide in reverse.
leave a comment
Your email address will not be published. Required fields are marked *