Kindle Fire Screen Repair Video Guide
June 4, 2018 | 0 Comments
This is an in-depth take apart repair guide showing how to fix the Kindle Fire. Our video will guide your you through all the steps required showing how to repair your Kindle Fire and make internal repairs such as flex cables or screen replacements. This Kindle how to video has been created by the RepairsUniverse team to insure a quick and safe repair is made on your Amazon Kindle Fire. We show how to fix both the LCD screen display and also the outside glass screen also known as the touch screen digitizer. Following these instructions and installation our replacement parts will make your device like new again!
This guide will help you to install the following Kindle Fire parts:
- Amazon Kindle Fire Glass Touch Screen Digitizer Replacement
- Amazon Kindle Fire LCD Screen Replacement
- Other Amazon Kindle Fire Parts
Tools Required:
- Safe Open Pry Tool
- Small Phillips Screwdriver
- Adhesive Strips
- (For Touch Screen Replacements)
- Metal Pry Tool (Suggested)
Kindle Fire Screen Replacement Take Apart Guide:
We recommend fully watching the video before starting the repair, and then pausing / rewinding and reviewing when needed.
Applying Adhesive to the Touch Screen Digitizer:
Simply reverse the instructions above to reassemble your Kindle Fire.
Amazon Kindle Fire Written Take apart guide:
- First, carefully run the case opener tool along the edge of the unit to release the clips holding the back cover. Start near the top, near the loud speakers.

Figure 1
- With the back cover removed, you can now remove the battery connection. This is located on the bottom of the motherboard, circled in Yellow on Figure 2. Once the connector is released, use a pry tool to release the battery. The battery is held in place with adhesive.
- Using a Phillips screwdriver release the large touch screen digitizer ribbon, with the screws removed pull up the tab andï release the ribbon . Do the same for all other ribbons and connectors on the motherboard. Located in Red circles on Figure 2.

Figure 2
- Release all ribbon located in yellow in Figure 2 and Figure 3. Many are jaw connectors - to release these, flip the clip and then pull the cable out. The LCD flex cable is a "pop" connector, simply use a pry tool to apply upward pressure.
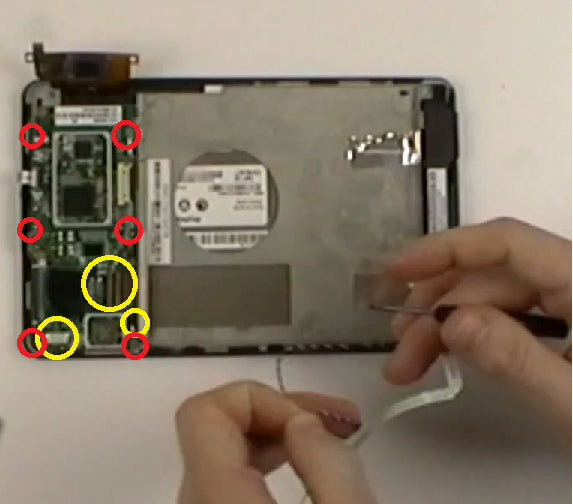
Figure 3
- Now with all the ribbons and cables release, remove the six (6) Phillip head screws using the Phillip screwdriver to release the motherboard. These screws are located in red on Figure 3.
- Remove the internal frame of the Fire, a total of 5 small Phillips screws. Underneath one of the corners is accelerometer motion sensing device, once the screw is removed, you can remove this small flex cable.
- Remove the four (4) Phillips screws holding the LCD screen in place, located in Figure 4. The LCD screen can easily be removed.
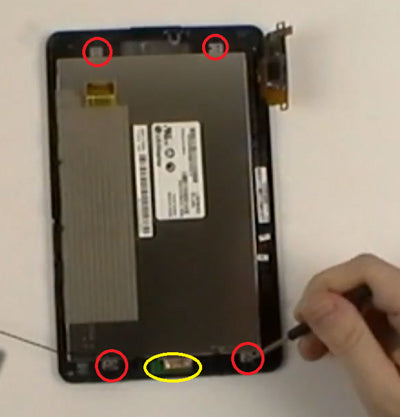
Figure 4
- To replace the touch screen digitizer you will need to release the WiFi flex cable, located in Yellow on Figure 4.
- You can now use a heat gun or hair dryer to heat the front of the frame and touch screen. Use quick movements and do not stay on one spot for too long. This will normally take 45 seconds.
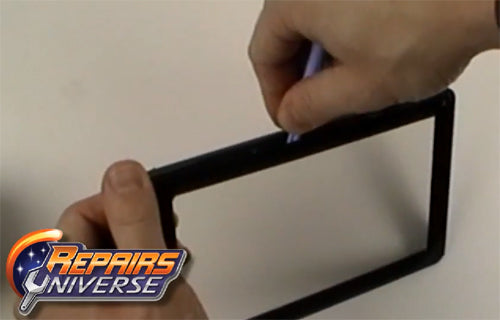
Figure 5
- Now, use a safe pry tool to release the adhesive holding the digitizer to the frame. Once the all four sides are released, pull the flex cable through the slot in the frame.
Now you will be able to replace any parts on your Amazon Kindle Fire. Simply replace the damaged parts with the new ones and reverse the order to put your phone back together again.
Notice:
Repairs Universe's guides are for informational purposes only. Please click here for details.
Learn about restrictions on reproduction and re-use of Repairs Universe's repair/take-apart/installation guides, and about creating hyperlinks to our guides.