Blackberry Bold 9700 Take Apart Repair Guide
June 4, 2018 | 0 Comments
View the downloadable version of our how to fix a Blackberry Bold 9700 screen guide.
In this take apart repair guide we show how to disassemble the BlackBerry Bold 9700 cell phone quickly and safely. This guide was designed by the Repairs Universe team.
This guide will help you to install the following BlackBerry Bold 9700 replacement parts:
Tools Required:
Blackberry Bold 9700 Take apart guide:
- Remove the back cover (battery cover) from the phone and then remove the battery, SIM and memory cards.
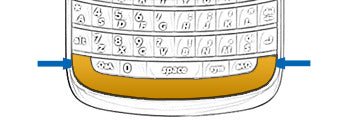
Figure 1
- You will now need to remove the bottom cover from the front side of the phone. Use safe open pry tool to carefully pry off this cover. Be careful not to damage the cover or the keyboard while prying it off. The location of the bottom cover is highlighted with orange color in the figure 1.
- The removal of bottom cover from the front will expose two screws. The location of these screws are indicated in figure 1 by blue arrows. Unscrew these two screws using a T5 Torx screwdriver.
Figure 2
- Now you need to remove the front frame / bezel from the unit. Use safe open pry tool to carefully pry off the frame from the phone body. Note that you will need to use the pry tool to unhook the clips at the sides and the bottom only. When the bezel is released from the sides and bottom, you will need to push it up to release it completely from the phone body. Figure 2 shows how the frame will look like after removal.
- The keyboard should also be free to remove now; you can just pull it up and put it aside.
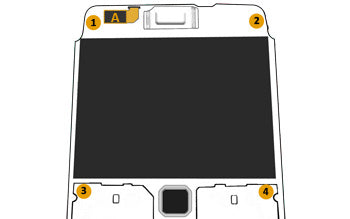
Figure 3
- The next step is to remove 4 screws from the unit using T5 Torx Screwdriver. The locations of these screws are indicated in the figure 3 by orange circles.
- Use a safe open pry tool to disconnect a ribbon cable connector at the location 'A' in the figure 3.
- The mainboard of the phone can also be removed now. Carefully lift the mainboard up at the top first and gently take it out from the phone assembly.
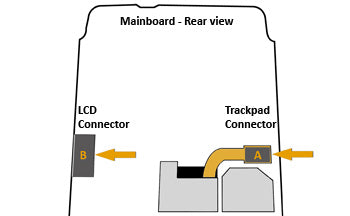
Figure 4
- You will now need to remove the trackpad from the mainboard. Upon turning the mainboard over you will notice two ribbon cable connectors (A and B in figure 4) at the middle of the board, one on each side. Using safe open pry tool, first disconnect the connector A whose flex cable is coming through a gap on the mainboard as shown in the figure 4. You can now lift up the trackpad from the other side of the mainboard. But be careful as you will need to run its cable connector from the gap.
- Now in order to disconnect the LCD connector, flip the mainboard over again. Use safe open pry tool to disconnect the connector at the location B from the side indicated by orange arrow in figure 4 .
- With the LCD connector disconnected, you can now start the process of removing LCD. Note that the LCD is held in place with the clips at the top and a little bit of adhesive. So first use safe open pry tool to carefully loosen up the clips of LCD at the top and then carefully pry off the LCD.
The Blackberry Bold 9700 is now disassembled and you can replace the damaged part(s) with new ones. Reverse the instructions above to reassemble your phone.
Notice:
Repairs Universe's guides are for informational purposes only. Please click here for details.
Learn about restrictions on reproduction and re-use of Repairs Universe's repair/take-apart/installation guides, and about creating hyperlinks to our guides.