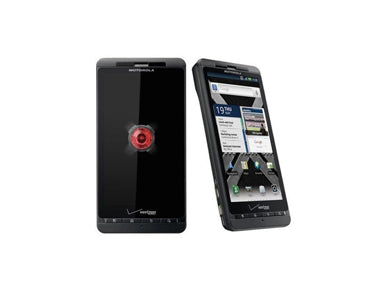
Motorola Droid X2 Repair Guide
June 4, 2018 | 0 Comments
View the downloadable version of our how to fix your Motorola Droid X2 screen guide.
This repair guide for the Motorola Droid X2 will walk you through all steps required to quickly and safely repair a damaged screen or other internal parts. The how to guide will focus on disassembling and replacing a cracked touch screen or damaged LCD screen on the X2. Using this guide will insure a quick and safe repair is made on your Motorola smartphone.
This guide will help you to install the following Motorola Droid X2 part(s):
- Motorola Droid X2 Touch Screen Digitizer Replacement - Version A (6250)
- Motorola Droid X2 LCD Screen Replacement - 6250 Version
- Motorola Droid X2 Touch Screen Digitizer Replacement - Version B (6065)
- Motorola Droid X2 LCD Screen Replacement - 6065 Version
Tools Required:
- Safe Open Pry Tool
- T5 Torx Screwdriver
- T3 Torx Screwdriver
- Adhesive Strips (For touch screen repair)
Motorola Droid X2 Take apart video repair guide:
The X2 is now disassembled and you can replace the damaged part(s) with new ones. Reverse the instructions above to reassemble your phone.
Applying Adhesive to the Touch Screen Digitizer:
Motorola Droid X2 Take Apart Repair Guide:
- To begin, remove the back battery cover.
- Next, using the battery pull tab to remove the battery.
- Next, you're going to one to remove the top and the bottom brackets from the front of the phone.
- Using a safe open pry tool, gently run the tool along its sides of these brackets and they will come right off.
- Next, you're the one to remove the following (4) four screws first, two on the bottom of the phone, and two on the top. These are T5 torx screws.
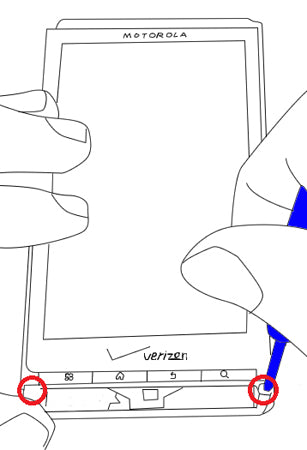
Figure 1
- Next using your Torx5 screw driver, remove the two screws on the back housing cover.
- Next, using your safe open pry tool, run along the long sides of the phone, this will enable you to release the back frame housing away from the front assembly of the phone.
- Next, using a Torx three screw driver, you were going to remove the following (9) nine screws holding your frame in the place.
- Next, using a safe open pry tool, you were going to release the LCD and digitizer cable flex ribbons. One is holding by a jaw connector, you will need to release this jaw connector as shown here to release that flex cable.
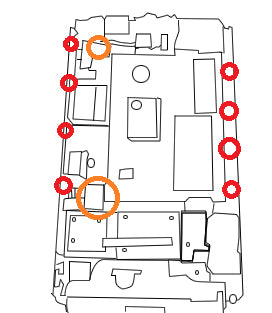
Figure 2
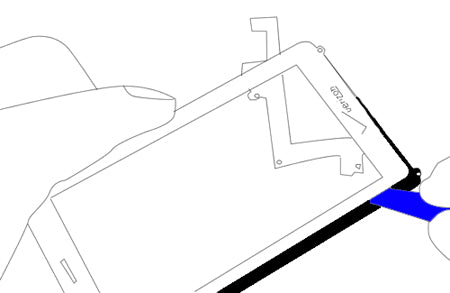
- Now, you are going to need to release the antenna flex cable holding the place on the top of the phone. Use your finger or safe open pry tool to gently release it from the board.
- Now, you can gently move your motherboard over to the left hand side. You will notice that the flex cable in the middle of the board is either connected or disconnected from the board. If it is still connected, use your safe open pry tool to disconnect it from the board.
- Lastly, you are going to remove the camera from the actual back of the phone. Once this is removed, you can safely remove the motherboard away from the phone.
- Now, using your Torx three screwdriver, remove the following (4) four screws from the bottom of the phone.
- Now, using a safe open pry tool, gently release the flex cable ribbon with the jawbone connector from the phone. Be careful to release the jaw connector first before removing your flex cable ribbon.
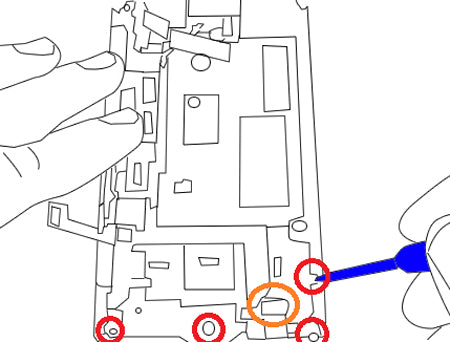
Figure 3
- Now, you will need to go ahead remove the flex cable ribbon from the phone. Be careful, it is holding place with adhesive, so when you release it from the middle backing, it will take a little bit of effort. Do not tear the flex cable ribbon doing this.
- Once this is complete you can now separate the LCD back plate from phone.
- Next, using a hot air heat gun, gently heat up the sides of the digitizer touch panel. This will go ahead and loosen up the adhesive holding your touch screen in place from the actual midframe of the phone.
- Now, using your safe open pry tool, gently run along the sides of the touchscreen from the housing. This will allow you to separate the touch screen glass from the actual midframe housing of the phone.
- Once this is complete, you can now replace your touch screen digitizer on your Droid X2.
Now you will be able to replace any parts on your Motorola Droid X2. Simply replace the damaged parts with the new ones and reverse the order to put your phone back together again.
Notice:
Repairs Universe's guides are for informational purposes only. Please click here for details.
Learn about restrictions on reproduction and re-use of Repairs Universe's repair/take-apart/installation guides, and about creating hyperlinks to our guides.