LG G Flex Repair Guide
June 4, 2018 | 0 Comments

The repair techs at RepairsUniverse have written a extensive Teardown Repair Guide for the LG G Flex. The detailed instructions will show you step by step on how to dismantle your LG Flex to replace a damaged display assembly and/or small defective internal components. (i.e. battery, front/rear camera, dock port assembly, vibrator motor, home button, loudspeaker,etc).
Visit our LG G Flex parts page to find high quality replacement parts and tools for your LG G Flex smartphone. Doing the repair yourself is a popular and inexpensive solution for a broken phone.
Recommended Tools:
- Small Phillips Screwdriver
- Safe Open Pry Tool
- Spudger Opening Tool
- Fine Point Tweezers
- SIM Card Tray Removal Tool
- Metal Opening Tool
- Heat Gun
LG G Flex Screen Replacement & Repair Video
LG G Flex Battery Replacement Video

LG G Flex Teardown Guide
Repair Service: If after reading our guide and you are hesitant about completing the repair yourself, we have experienced repair technicians that can correctly diagnose and restore your phone to its former working condition. We offer 100% repair guarantee and a quick turnaround time, all at an affordable price. Call 866-925-2350 between 9am and 5pm PST or visit our Repair Service Page for more information.


- On the side of the LG G Flex, use the SIM card removal tool or a paper clip to remove the SIM card tray from the LG smartphone.


- The seam/opening between the back battery cover and the frame/front housing is relatively tight. Utilize the plastic opening tool to separate the back battery cover, carefully freeing all of the clips around the perimeter of the LG G Flex.

Loudspeaker

- Locate and remove the five small Phillips screws (#00) that secure the loudspeaker in place (marked with orange circles).
- The loudspeaker can now be removed from the LG G Flex smartphone, use the plastic opening tool or the spudger to gently pry it up and out of its location.


- Next, locate and remove the ten small Phillips screws (#00) that secure the protective cover/rear housing to the motherboard (marked with orange circles).
- Once the screws are removed you can use the plastic opening tool or the spudger to pry up the protective cover/rear housing and remove it from the LG D959.

Battery

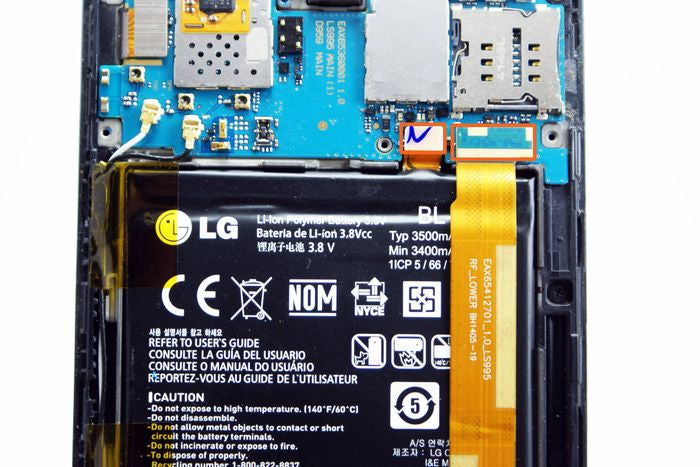
- Locate the two wafer plug connectors; use your fine tip curved tweezers or the spudger to disconnect them (marked with orange rectangles).


- The battery can now be removed from the LG G Flex smartphone. Use the flat end of the spudger or the metal spudger to gently pry it up and out of its location. Since it is secured by a small amount of adhesive, the use of a heat gun or blow dryer may be helpful.

Front Facing Camera

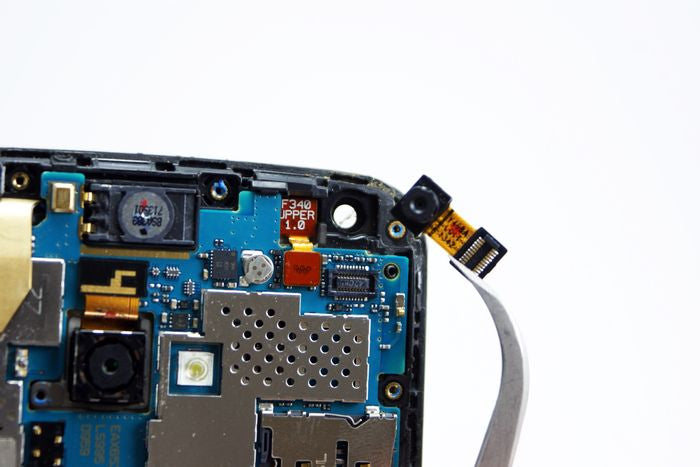
- The front-facing camera should now be free for removal. Use the fine tip curved tweezers to carefully lift it from its housing and out of the LG D959.

Rear Facing Camera

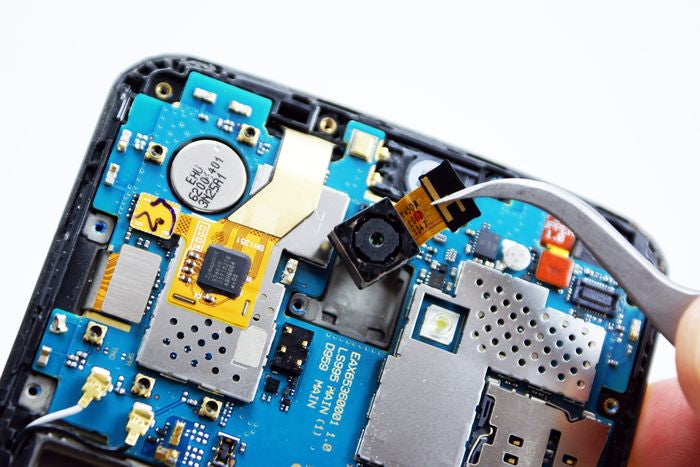
- The rear-facing camera should also be free for removal. Use the fine tip curved tweezers to carefully lift it from its housing and out of the LG G Flex.

Dock Connector and Headphone Jack Assembly

- Locate the two coaxial plug connectors; use your fine tip curved tweezers or the spudger to disconnect them (marked with open orange circles).
- Next, locate and remove the three small Phillips screws (#00) that secure the dock connector in place (marked with closed orange circles).
- The dock connector and headphone jack assembly is secured into the bottom of the LG G Flex with adhesive. Use a little heat, and the flat side of your spudger, to carefully pry it up and out of the LG smartphone.

Motherboard

- Locate the two coaxial plug connectors; use your fine tip curved tweezers or the spudger to disconnect them (marked with open orange circles).
- Now, locate the three wafer plug connectors; again use your fine tip curved tweezers or the spudger to disconnect them (marked with orange rectangles).


- The motherboard can now be removed from the LG G Flex. Utilizing the fine tip curved tweezers gently maneuver it up and away from the LG smartphone.

Earpiece Speaker

- The earpiece speaker should now be free for removal. Use the fine tip curved tweezers to lift the earpiece speaker up and out of the LG D959.

Proximity Sensor Assembly

- The proximity sensor should also be free for removal, use the fine tip curved tweezers to gently lift it up and out of its location.

Display Assembly (LCD and Touch Screen)

- Locate and remove the six small Phillips screws (#00) that secure the display assembly into the frame/front housing (marked with orange circles).


- The display assembly (LCD & digitizer) is fused together and secured to the frame /front housing of the LG D959 with a good amount of adhesive. It will require heat, and patience, to separate them.
- This procedure is only recommended on a LG G Flex with a DAMAGED LCD or touch screen/front panel that requires replacement.
- Use the heat gun or blow drier to heat the adhesive securing the display assembly to the smartphones frame/front housing. The heat will warm-up/loosen the adhesive securing the parts together.


- You can now use the metal opening tool, or the flat side of your spudger, to continue working around the entire LG G Flex display assembly slowly separating it from the frame/front housing.

LG Flex Components

- Major components of the LG G Flex
Notice:
RepairsUniverse does not accept any liability for damage, or injury caused, while you are following our disassemble guides. We make no representations, warranties, or conditions of any kind, express or implied. Utilizing these guides to assist you in repairing your mobile devices will void your warranty. RepairsUniverse strictly prohibits altering or modifying our teardown guides for commercial use, reproduction, or publication

