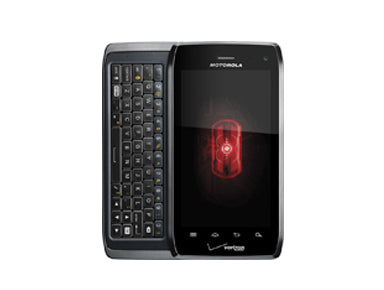
Motorola Droid 4 Repair Guide
June 4, 2018 | 0 Comments
View the downloadable version of our how to fix your Motorola Droid 4 screen guide.
The RepairsUniverse team now offers this written repair guide to assist you in replacing the touch screen digitizer or LCD screen on your Motorola Droid 4. We take you through each step, from screw removals, to flex cables, adhesive, and much more.
This guide will help you install the following Motorola Droid 4 part (s):
- Motorola Droid 4 Touch Screen Digitizer Replacement
- Motorola Droid 4 LCD Screen Replacement
- And Other Motorola Droid 4 Parts
Tools Required:
- Safe Open Pry Tool
- T5 Torx Screwdriver
- T3 Torx Screwdriver
- Adhesive Strips (For Touch Screen Replacements)
- Hot Air Gun / Hair Dryer
Motorola Droid 4 Video Repair Guide:
Motorola Droid 4 Take Apart/Repair Guide:
- Remove the back battery cover by sliding it down and then lifting it from the front of the phone.
- Use a safe open pry tool to lift the Micro SIM cover.
- Remove the battery sticker from the device by carefully peeling it away.
- Use a Torx T5 screwdriver to remove the two (2) screws holding the battery in place.
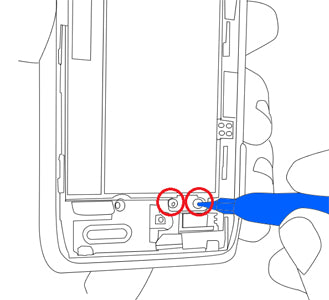
Figure 1
- Now, using a safe open pry tool, carefully remove the battery. The battery will held in place with a large amount of adhesive.
- Pry away the top camera cover which is held in place with adhesive. Under the cover there will be two (2) hidden Torx T5 screws.
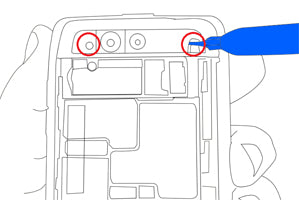
Figure 2
- Using your safe open pry tool, pry carefully around the edges of the back bezel and remove the back housing from the rest of the device.
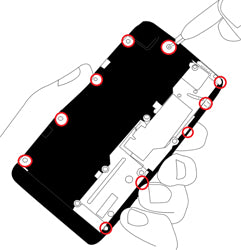
- There will now be thirteen (13) Torx T5 screws holding the mid chassis in place. Remove these screws and carefully pry off the mid frame chassis from the rest of the device.
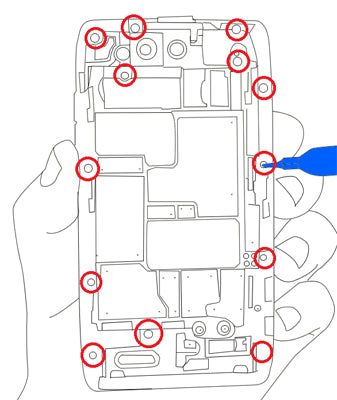
Figure 3
- You will now have access to the motherboard. There will be two (2) "pop" connectors that will need to be disconnected as shown in Figure 4.
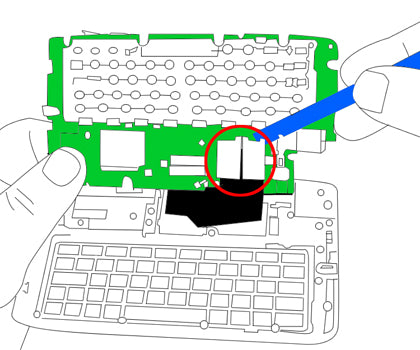
Figure 4
- The motherboard can now be set aside and we are left with the front slide portion and top of the keyboard.
- We will now need to remove the two (2) Torx T3 screws holding the slide and keyboard in place.
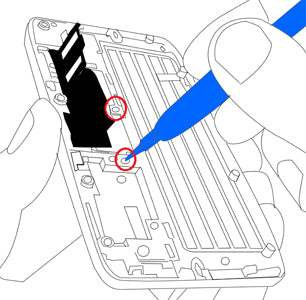
Figure 5
- Carefully remove the keyboard from the device, being careful of the flex cable that is fed through the slide..
- On the back of the screen assembly there will be ten (10) Torx T3 screws that will need to be removed.
- The front panel can now be removed from the LCD assembly.
- The touch screen digitizer is part of the front panel. To remove the touch screen you will need to heat the front of the panel using a hair dryer/heat gun to warm the adhesive holding the digitizer in place.
- Use medium heat for about 45-60 seconds using quick movements around the outside edges.
- Now, use a safe open pry tool to pry between the touch screen and the bezel to release the adhesive holding the touch screen in place. Reheat if necessary.
- Carefully feed the flex cable through the housing are fully remove the touch screen from the device.
- For LCD repair, carefully release the top "pop" connector above the LCD screen. You can now lift the LCD screen from the housing and remove it fully from the device.
Applying Adhesive to the Touch Screen Digitizer:
Now you will be able to replace any parts on your Motorola Droid 4. Simply replace the damaged parts with the new ones and reverse the order to put your phone back together again.
Notice:
Repairs Universe's guides are for informational purposes only. Please click here for details.
Learn about restrictions on reproduction and re-use of Repairs Universe's repair/take-apart/installation guides, and about creating hyperlinks to our guides.