Nokia C6-01 Take Apart Repair Guide
June 4, 2018 | 0 Comments
This take apart repair guide has been put together by the Repairs Universe team and will take you through the steps to dissemble your Nokia C6-01 phone safely so you can install replacement parts.
This guide will help you to install the following Nokia C6-01 part(s):
- Nokia C6-01 Touch Screen Digitizer Replacement
Tools Required:
- Safe Open Pry Tools
- T6 Torx Screwdriver
- Adhesive Strips (For Touch Screen Repair)
Nokia C6-01 Take apart guide:
- First thing to do is take off the back battery cover and remove the battery.
- Remove the top cover using a safe open pry tool and prying the edges of the top back cover. This will have 3 clips that will need to be released. Once the clips are released, press the cover gently upwards and it will slide, allowing you to remove this piece of the housing.
- Now, remove the four (4) Torx T6 screws in its corners, as shown in Figure 1.
- The screen assembly is held in place to the housing with four (4) little clips. Carefully release these clips as shown in Figure 1 with your safe open pry tool. With these released, the housing can be partially removed. Be extremely careful, as there will still be two attached flex cables.
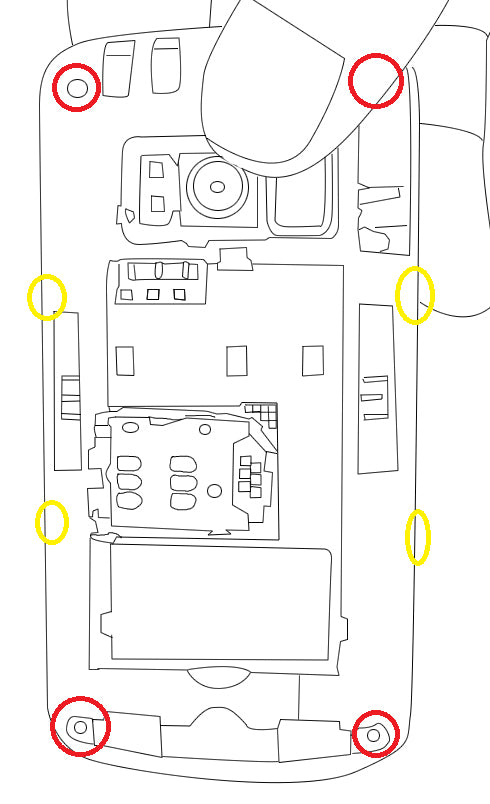
Figure 1
- Release the two (2) pop connectors and separate the screen assemblies as shown in Figure 2.
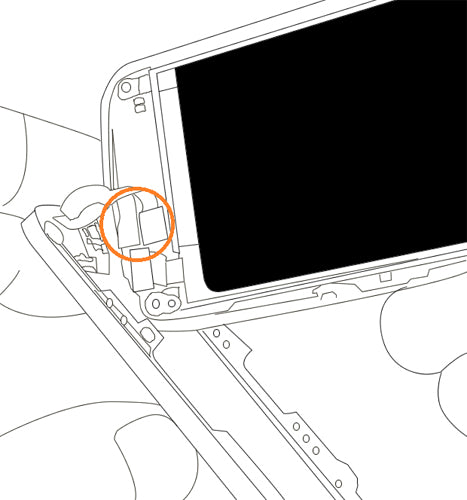
Figure 2
- If replacing the touch screen, locate the keypad flex on the touch screen housing. Notice the three (3) clips holding the keypad in place, as shown in Figure 3. Use a safe open pry tool to gently release these clips and remove the keypad.
- The touch screen will now need to be heated using a hair dryer or heat gun on medium heat. Use quick movements around the outside edges of the screen for 45-60 seconds. From there, use a safe open pyre tool to gently remove the old touch screen from the front housing.
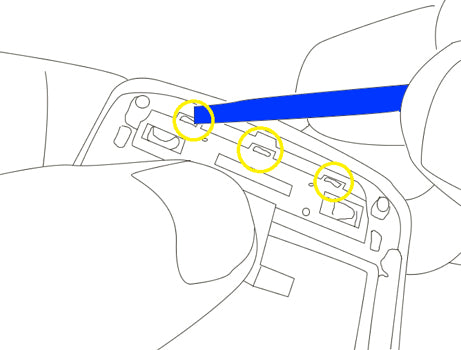
Figure 3
- To remove the LCD screen - Gently disconnect the pop connector shown in Figure 4. With this disconnected you can carefully remove the LCD screen from the housing use a safe open pry tool. Work your pry tool slowly around the outside edges of the screen and carefully remove the LCD screen.
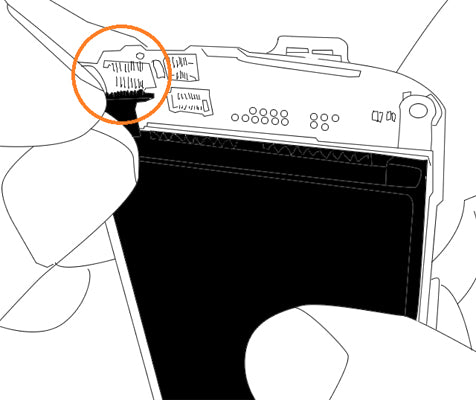
Figure 4
Applying Adhesive to the Touch Screen Digitizer:
Notice:
Repairs Universe's guides are for informational purposes only. Please click here for details.
Learn about restrictions on reproduction and re-use of Repairs Universe's repair/take-apart/installation guides, and about creating hyperlinks to our guides.
leave a comment
Your email address will not be published. Required fields are marked *