HTC Evo Design 4G Take Apart Repair Guide
June 4, 2018 | 0 Comments
This in depth take apart guide for the HTC Evo Design 4G has been compiled by the RepairsUniverse team and will guide you through proper disassembly of your smartphone. Following these instructions carefully will insure a safe and quick repair is made on your Evo Design 4G.
This guide will help you to install the following HTC Evo Design 4G part(s):
- HTC Evo Design 4G Touch Screen Digitizer Replacements
- HTC Evo Design 4G LCD Screen Replacement
- Other HTC Evo Design 4G Parts
Tools:
- Safe Open Pry Tool
- Torx T5 Screwdriver
- Small Phillips Screwdriver
- Adhesive Strips (For Touch Screen Repairs)
- Heat Gun/Hair Dryer
HTC Evo Design 4G Take Apart Repair Guide:
- To begin, remove the lower back cover. There will be three (3) screws that will need to be removed. Two (2) will be Torx T5 and one (1) will be small Phillips.
- Use a safe open pry tool to pry between the volume button and the upper part of the back housing. Carefully glide the pry tool fully around the outside edges. There will be an adhesive pad holding the cover in place in the center of the housing.
- Three (3) Torx T5 screws can be found once the upper back housing is removed. There will also be one (1) small Phillips screw.
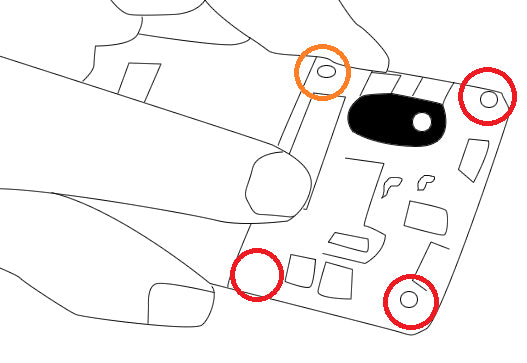
Figure 1
- The full back housing can now be removed. Simply apply light pressure near the ear speaker forward and gently remove the housing.
- Remove the two (2) visible small Phillips screws, located on either side in the middle. Flip the lower portion of the housing down, this will expose a large adhesive pad which will need to be removed to reveal two (2) more small Phillips screws.
- Using a safe open pry tool, you can now release the rest of the housing covering the motherboard. Glide the pry tool around, releasing the clips.
- With the motherboard visible, use a safe open pry tool to carefully lift the vibrator motor and allow it to hang connected to the motherboard.
- Carefully pry the motherboard up, being careful as there are still 2 flex cables connected to the motherboard.
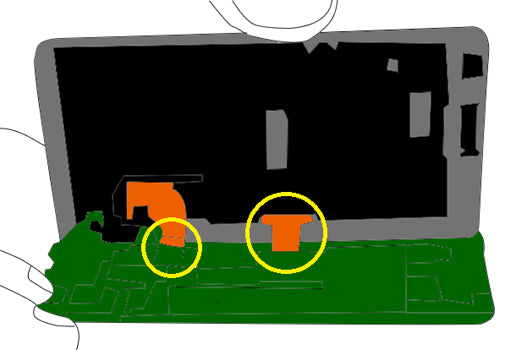
Figure 2
- Release the two (2) flex cables. Both will be covered with mylar tape. Remove the tape and lift the back of the connector up. From there, carefully slid the cable out of the connector.
- You can now safely remove the motherboard.
- Now, heat the front of the screen using a hair dryer or heat gun. Use quick movements, not staying in one area for too long. Medium - high heat will be required to properly warm the adhesive holding the screen assembly to the front housing. Take your time and reheat as required. Use a safe open pry tool to pry between the screen and front housing.
- The touch screen digitizer can now be removed from the assembly. Being careful as the flex cable will need to be guided through the housing.
- Carefully pry the LCD screen from the front housing.
- Your HTC Evo Design 4G has now been fully disassembled.
Applying Adhesive to the Touch Screen Digitizer:
Simply replace the damaged parts with the new ones and reverse the order to put your phone back together again.
Notice:
Repairs Universe's guides are for informational purposes only. Please click here for details.
Learn about restrictions on reproduction and re-use of Repairs Universe's repair/take-apart/installation guides, and about creating hyperlinks to our guides.