HTC MyTouch 4G Slide Screen Repair Take Apart Guide
June 4, 2018 | 0 Comments
View the downloadable version of our how to fix your HTC MyTouch 4G Slide screen guide.
This disassembly guide has been put together by the Repairs Universe team and shows the process required to take apart your MyTouch 4G Slide safely in order to replace any worn-out or broken parts. With this guide you should be able to replace a broken glass touch screen, dead LCD, or any other damaged components to repair your phone.
This guide is aimed at helping you replace the following MyTouch 4G Slide repair parts:
- HTC MyTouch 4G Slide Touch Screen Digitizer Glass Replacement
- HTC MyTouch 4G Slide LCD Screen Replacement
Tools:
- Safe Open Pry Tool
- T5 Torx Screwdriver
- Small Phillips Screwdriver
- Adhesive Strips (For touch screen repairs)
- Heat Gun / Hairdryer
HTC MyTouch 4G Slide take apart repair guide:
The MyTouch 4G Slide is now disassembled and you can replace the damaged part(s) with new ones. Reverse the instructions above to reassemble your phone.
Applying Adhesive to the Touch Screen Digitizer:
MyTouch 4G Slide Written Take Apart/Repair Guide:
- Remove the battery back door has it cover simply using a safe open pry tool and slide all around the sides. Once it has been removed you need to remove the battery, micro sd card, and sim card from the phone.
- Next, using a Torx 5 screwdriver, you need to remove four (4) screws - two on top and two on bottom.. Remove the two (2) screws in the middle of the phone using a small Phillip screwdriver.
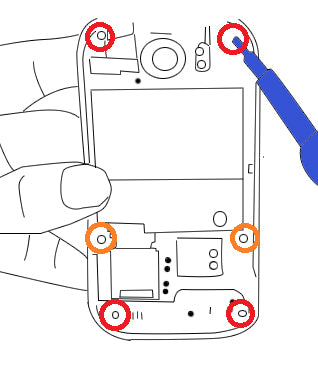
Figure 1
- Next using a safe open pry tool you will remove the little plastic housing on the bottom of the phone. Once removed you can now release the bezel around the sides of the phone using the safe open pry tool and simply just go around all the sides of the phone releasing the bezel clips safely.
- Remove two (2) additional screws on a top left as well as one screw on the top right , the two (2) on the left or Torx 5 screws (located in red on Figure 2) and the one (1) screw on the right is a small Phillip screw (located in orange). With those screws are removed you can now release three flex cables along the sides of the phone that are holding with adhesive one being the power cable, the volume up down ribbon and the third one is in the other side of the phone and that one should be release as well. These are held in place with adhesive and simply need to be released from the housing.
- Once those three cables are release you can now release one more flex cable on the right side of the motherboard using a safe open pry tool and pop it right off.
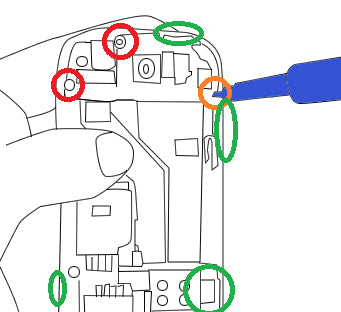
Figure 2
- Next you can now release the motherboard from the actual phone, go along the sides releasing the clips holding the motherboard in place (being very careful not to actually damage your motherboard). Underneath you motherboard is a flex cable from the keyboard which is under your phone. You would need to release the flex cable and pop it right off. You can now separate the motherboard from the LCD display housing.
- Release the eight (8) Phillip head screws on the back of the keyboard housing. Once removed you can now separate the keyboard from the actual LCD display monitor (be careful as the keyboard is still holding with the flex cable so you would need to release the flex cable very careful as it is holding on two sides, there is also an adhesive on the black portion so you would need to pry it very slowly).
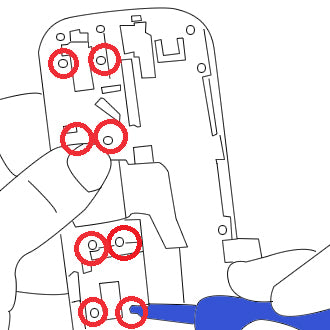
Figure 3
- Next, using a safe open pry tool you will need to release the silver frame around the side of the phone this cover up two screws that you would need to remove as well. Once the frame is release you can go ahead and remove the two screws on the top as well as the two screws on the bottom of the back panel.
- Release the bezel frame from the back of the phone. You may want to use a hair dryer or heat gun to warm the adhesive a bit, as it can be a strong bond. Simply use your heat on a medium setting and move quickly around the edges for about 30-45 seconds.
- Release the digitizer cable holding into the back of the phone, slowly pulled back the tape and release the jaw connector, pushing it with upward with the safe open pry tool and pop out the digitizer flex cable of your touch screen.
- Using a hot hair heat gun heat up the front as well as a little bit of the back of your screen, this will loosen up the adhesive securing your LCD touch screen and display together.
- Once adequate heat has been applied use a safe open pry tool and run along the sides of the touch screen glass (be very careful not to damage the LCD during the process as it is very delicate piece of equipment). Once it is complete you can go ahead and replace your touch screen glass or your LCD display monitor.
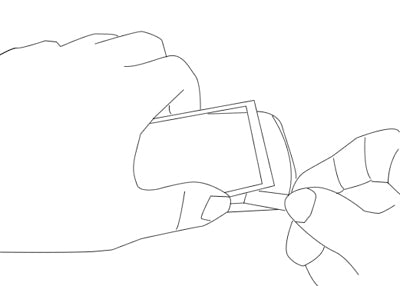
Figure 5
Now you will be able to replace any parts on your HTC MyTouch 4G Slide. Simply replace the damaged parts with the new ones and reverse the order to put your phone back together again.
Notice:
Repairs Universe's guides are for informational purposes only. Please click here for details.
Learn about restrictions on reproduction and re-use of Repairs Universe's repair/take-apart/installation guides, and about creating hyperlinks to our guides.