Kindle Fire HD 7" Screen Repair Guide
June 4, 2018 | 0 Comments
This video guide for the Amazon Kindle Fire HD 7" will show you the full disassembly process required to replace a damaged touch screen or LCD screen. Following this video repair guide will insure a safe and secure repair is made. This repair guide has been compiled by the Repairs Universe team and is a reference guide for replacing a touch screen or LCD screen on the Kindle Fire HD.
This guide will help you to install the following Kindle Fire HD 7" parts:
Tools Required:
- Safe Open Pry Tool
- Small Phillips Screwdriver
- Adhesive Strips (For Touch Screen Replacements)
- Metal Pry Tool (Suggested)
Kindle Fire HD 7" Take Apart Guide:
We recommend fully watching the video before starting the repair, and then pausing / rewinding and reviewing when needed.
Applying Adhesive to the Touch Screen Digitizer:
Simply reverse the instructions above to reassemble your Kindle Fire HD 7".
Kindle Fire HD 7" Written Take Apart Guide:
- Power off device
- Remove the back case by inserting a pry tool and slowly move around the outside edge.�Be careful not to lose the power button and volume buttons as they might fall off
- With the cover removed, peel off the copper tape
- Disconnect the battery and wifi antenna from the motherboard (yellow circles)
- Carefully lift the WiFi antenna from all the clips surrounding the battery
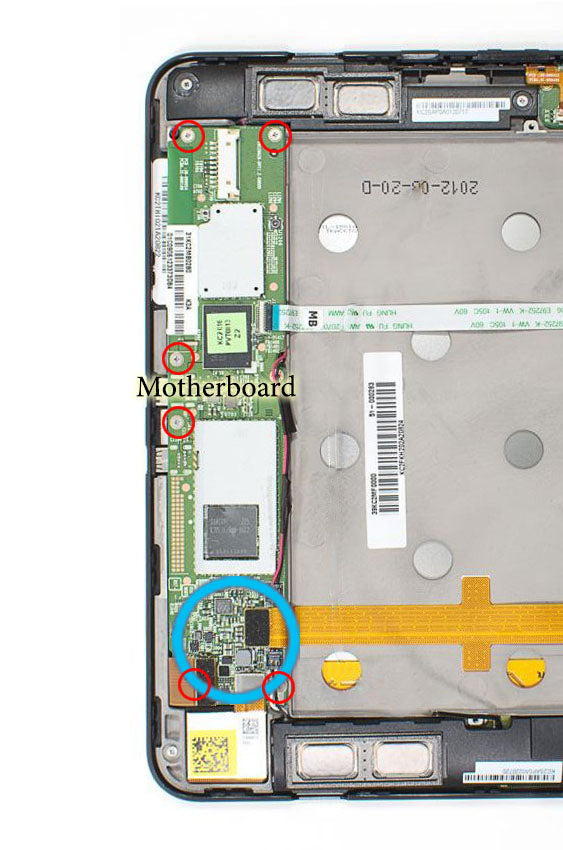
- The battery can be released once the single T5 Torx screw and 4 Phillips screws (indicated by the red circles) are removed

- Remove the 2 screws (Red circles) holding the upper speaker assembly
- Follow the speaker wire from upper speaker and disconnect it the mother board. At this time the speaker can be safely removed
- Unplug the lower speaker connector from the main board
- Next remove the single screw holding the lower speaker assembly�
- Next remove the WiFi antenna from the casing by lifting up the tape holding it in place
- The audio jack board removal starts by disconnecting the ribbon leading to the motherboard(Yellow Circles)
- Release the small flex cable connector for the volume and power. (Blue Circle) Note- Do not remove the ribbon yet
- Next you will need to remove the 2 screws holding down the Audo Jack board
- Once the Audio Jack and its board have been removed, gently remove the volume and power flex cable with your flat pry tool
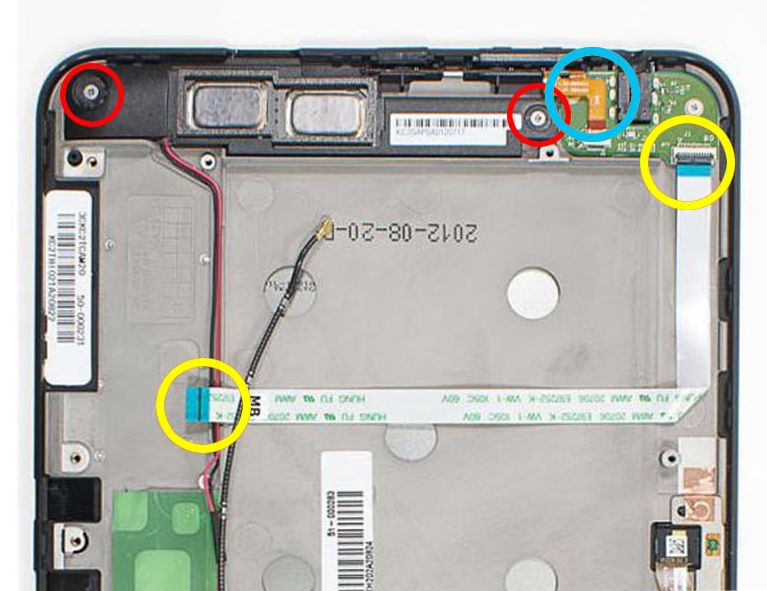
- Lift up the remaining connectors (Large Blue Circle) on the motherboard
- Remove the remaining screws (Red Circles) holding the motherboard in place
- Angle the board slightly as you remove from the frame
- Camera assembly can be removed next by disconnecting the flex cable
- 2 screws holding the mid board along with 2 additional screws holding the flex cable, need to be removed next. When removing the mid board, be careful not to tear the ribbon cable as you thread it through the mid board opening.
- Depending on the replacement part, you may have to remove the front bezel.
- When removing out bezel from the screen assembly it is recommended to heat up the outside edges of the frame to soften the adhesive (about 45 seconds with a hair dryer)
- Insert the pry tool into the seam and slowly work your way around the perimeter
- Reheat as necessary and be careful around the exposed flex cable.
Reverse the above instructions to reassemble you device
Repairs Universe's guides are for informational purposes only
Notice:
RepairsUniverse does not accept any liability for damage, or injury caused, while you are following our disassemble guides. We make no representations, warranties, or conditions of any kind, express or implied. Utilizing these guides to assist you in repairing your mobile devices will void your warranty. RepairsUniverse strictly prohibits altering or modifying our teardown guides for commercial use, reproduction, or publication