Samsung Galaxy S3 Video Take Apart Guide
February 24, 2019 | 0 Comments
This video repair guide is for the Samsung Galaxy S3. This popular smartphone can easily be damaged due to drops and falls. Luckily, replacing the screen assembly is very straight forwards. We suggest following this guide carefully to insure a quick and secure repair is made on your screen assembly or other internal parts.
This guide is aimed at helping you replace the following Samsung Galaxy S3 parts:
Tools:
Samsung Galaxy S3 take apart repair video:
We recommend watching the below video from start to finish before starting the repair, and then pausing / rewinding and reviewing when needed.
Reverse the instructions above to reassemble your phone.
Samsung Galaxy S3 Written Repair Guide
Tools Required:
- Safe Open Pry Tool
- Small Phillips Screwdriver
- Hot Air Gun / Hair Dryer
- The first step will be to remove the back battery cover and take out the battery, sim card, and memory card.
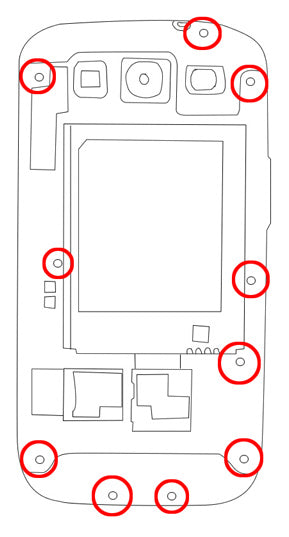
- Use a small Phillips screwdriver to remove the ten (10) screws as shown in Figure 1.
- With all screws removed we can now use a safe open pry tool to release all the clips holding the back cover in place. Take note that the upper (near rear camera) section is separate from the rest of the housing. Work your way with a pry tool around the edges and remove lower back housing from the device.
- The upper back housing (camera cover) has one pop connector which will need to be released before removing the upper back housing. You can now use a pry tool to remove all the back housing and fully expose the motherboard.
- With the back plate removed, you now have access to the motherboard. There will be a few cables that will now need to be released, as shown in orange in figure 2. �Remove the single small Phillips screw located near the sim card tray (red).
- You can now gently remove the motherboard with the rear camera still attached. Be sure no screws or other flex cables holding the motherboard in place.
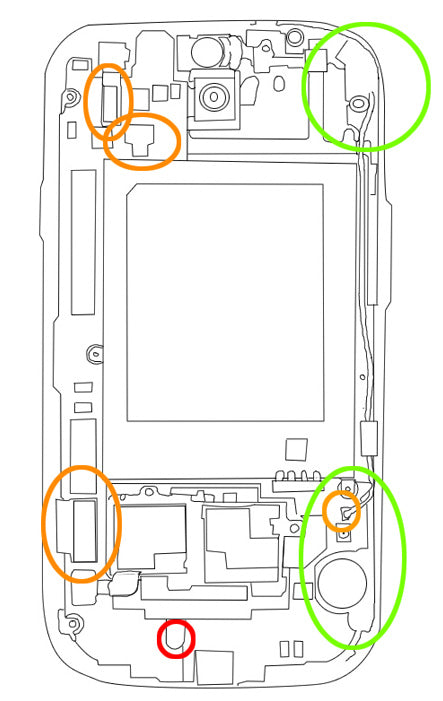
- With the motherboard removed we can now remove the ear speaker and volume flex cable as shown in green on figure 2. The speaker will be held in place with adhesive, as will the volume button flex.
- Remove the front camera and proximity sensor, the antenna cable which is adhered to the frame by a small flex cable, and a single small Phillips screw. The vibrate motor located at the bottom of the device will also need to be released.
- Using a heat gun or hair dryer we can now heat some of the adhesive holding the screen assembly to the frame. You will need to heat both the front and the back. On the front and back, use quick movement on the outside edges for about 30-45 seconds.
- With the adhesive softened, use a pry tool to begin removing the screen assembly away from the frame. Be sure no other connections or cables or holding the screen assembly to the frame. Focus prying on the front of the screen at both the top and bottom. Once the screen is lifted enough, pry under the LCD screen to remove the full screen assembly.
- The screen assembly can now be fully removed and replaced.
Notice:
Repairs Universe's guides are for informational purposes only. Please click here for details.
Learn about restrictions on reproduction and re-use of Repairs Universe's repair/take-apart/installation guides, and about creating hyperlinks to our guides.
Author: Curt Halford