Nexus 4 Back Glass Cover Repair Guide
June 4, 2018 | 0 Comments
Have you cracked or damaged the back cover on your LG Google Nexus 4 E960? Well you're in luck! The team here at RepairsUniverse have put together this in depth guide to assist with replacing the back battery cover of the Nexus 4 E960. The guide will show step-by-step how to repair the device and restore it to like new condition. Why spend the money purchasing a whole new phone when you can fix it yourself?
This LG Google Nexus 4 E960 repair guide will help you install the following parts:
Tools Required:
- Safe Open Pry Tool
- Spudger Opening Tool
- T5 Torx Screwdriver
- Adhesive Strips
- Dual Temperature Heat Gun
LG Google Nexus 4 E960 Back Cover Repair:
How to Take Apart LG Google Nexus 4 E960 (Step-by-Step Guide) :
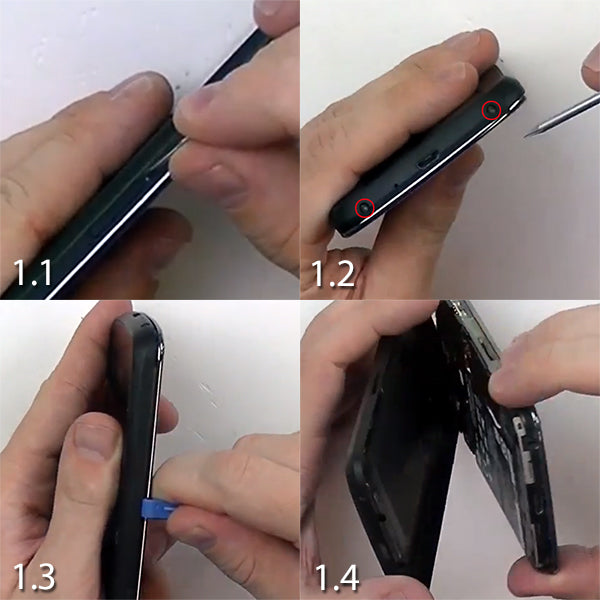
- To begin, start by completely powering down the device. Then using a Sim Card removal tool or a paperclip remove the Sim Card (Figure 1.1).
- Next remove the two (2) screws (circled in red) found at the bottom of the device (Figure 1.2).
- Begin separating the back housing from the rest of the device using a safe open pry tool. It's best to start at the bottom and shim your way around the edges and sides, which will release the clips (Figure 1.3).
- After the housing clips have been released the back housing can now be removed (Figure 1.4).
See Figure Below For Reference:
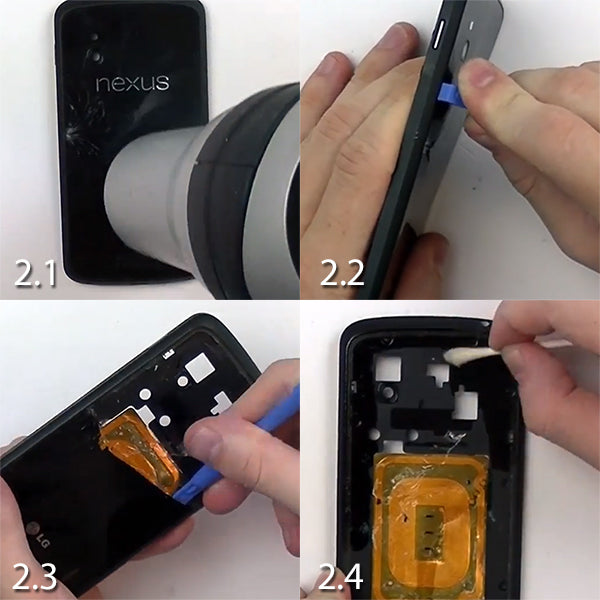
- With either a heat gun (on low heat) or a blow dryer (on medium heat), start warming up the back cover. Heat the cover for approximately 1 minute, making sure not to overheat the device as this can cause permanent damage (Figure 2.1).
- Once the cover and adhesive have been heated, with the pry tool wedge in between the glass and the housing (Figure 2.2). This step will take a lot of patience and thoroughness to complete. You will more than likely remove the glass in multiple pieces. Use caution during this removal as directly under the glass is the antenna and a flex cable (Figure 2.3). Be aware that the volume button should fall out at some point, simply place it to the side for later. Also, if the glass is being stubborn you can continue to heat it up in order to loosen the adhesive.
- After the glass cover has been taken off, using a Q-Tip and alcohol (or adhesive solvent) wipe down the mess that was left behind by the adhesive (Figure 2.4). At this point also use the pry tool to clean out any leftover shards of glass.
See Figure Below For Reference:
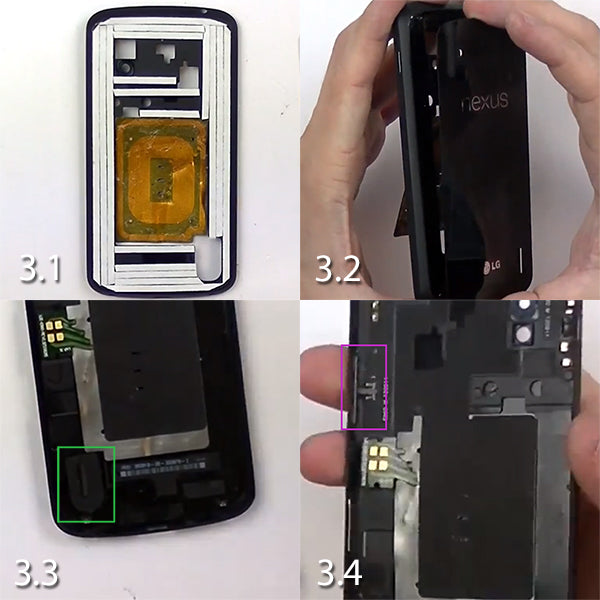
- The next step is to apply new adhesive strips on the housing (Figure 3.1), and then peel off the backs of the strips revealing the sticky portion.
- Place the new glass back cover in place of the old one (Figure 3.2).
- Then put the speaker mesh back in it's place (Figure 3.3, highlighted in green). You can use the same speaker mesh that was attached to the old cover.
- Reattach the volume button to the housing (Figure 3.4, highlighted in purple).
See Figure Below For Reference:
- Finally the device is now ready to be put back together. Connect the front housing to the back housing (they should snap together easily). Lastly, return the Sim Card to it's slot, and screw in the two (2) T5 Torx screws in the bottom of the device.
Notice:
Repairs Universe's guides are for informational purposes only. ">Please click here for details.
Learn about restrictions on reproduction and re-use of Repairs Universe's repair/take-apart/installation guides, and about creating hyperlinks to our guides