HTC Titan Repair Guide
June 4, 2018 | 0 Comments
View the downloadable version of our how to fix your HTC Titan screen guide.
Is your HTC Titan damaged? Need to replace a touch screen digitizer or other internal parts on your HTC smartphone? This written repair guide for the Titan will show you in a step by step manner how to quickly and safely disassemble your device and replace commonly broken parts.
This guide will help you to install the following HTC Titan part(s):
Tools Required:
- Safe Open Pry Tool
- Torx T5 Screwdriver
- Adhesive Strips (for touch screen repair)
- Hot Air Gun / Hair Dryer
HTC Titan Repair Guide:
- Begin by removing the back battery cover, battery, and sim card.
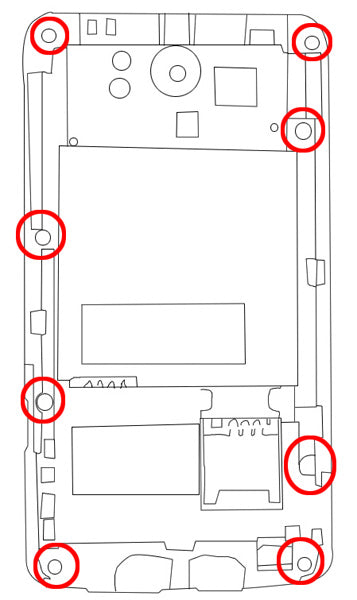
- With the back cover removed, we can now remove the eight (8) Torx T6 screws located in figure 1.
- There will now be three (3) latches along the top and sides that need to be released. Use a safe open pry tool to gently press these clips and remove the back housing from the rest of the device.
- The motherboard will now be exposed. There will be two (2) screws that need to be released, one at the top motherboard and one on the lower, shown in red on figure 2.
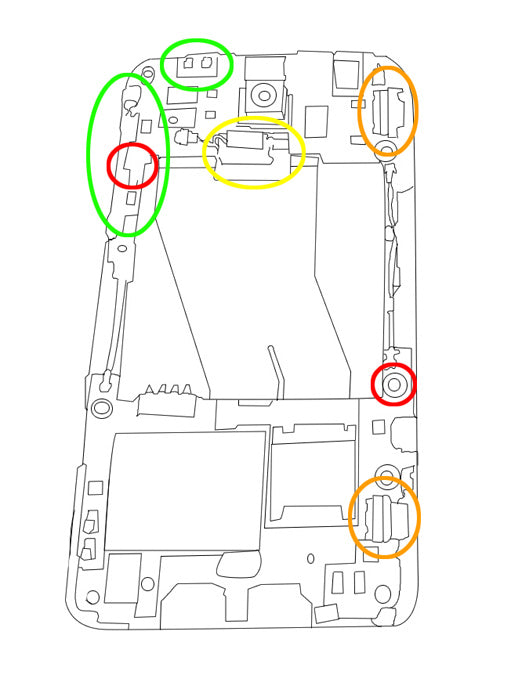
- You can now gently lift the vibrate motor from the plastic socket, leaving it connected by the wire cable (yellow).
- The power button and volume button will have two small flex cables located underneath the physical buttons. Use a safe open pry tool to gently lift these cables away from the housing. Be careful, as these are held in place with adhesive. (Shown in green in figure 1)
- Two (2) jaw connections will need to be released, one for the touch screen and one for the LCD screen. Gently lift the back of the jaw connector and remove the flex cable located inside. (Orange)
- Use a safe open pry tool to begin lifting the motherboard from the device. Be careful, as there are clips holding the motherboard in place. Release these clips and lift the upper and lower motherboard up. Note that the antenna cable will need to be wiggled loose from the cable fasteners.
- Remove the motherboard entirely. Use a heat gun or hair dryer to begin warming the front of the screen assembly. Work around the outside edges of the screen on medium heat for about 45 seconds. This will soften the adhesive holding the screen assembly to the housing.
- Once the screen is properly heated you can use a safe open pry tool to being lifting the screen assembly away from the housing. Be sure to lift both screens out at the same time.
- After the screens are partially released, be sure the flex cables are fed through the housing. Remove the screen assembly.
- Use the heat gun or hair dryer again to warm the seal between the touch screen and LCD screen. Use quick movements for about 30 seconds. Once this is complete, use a safe open pry tool to carefully separate the screens.
- You can now replace the touch screen digitizer or LCD screen.
Reverse the instructions above to reassemble your phone.
Applying Adhesive to the Touch Screen Digitizer:
Notice:
Repairs Universe's guides are for informational purposes only. Please click here for details.
Learn about restrictions on reproduction and re-use of Repairs Universe's repair/take-apart/installation guides, and about creating hyperlinks to our guides.