iPod Touch 5th Gen Repair Guide
June 4, 2018 | 0 Comments

View the downloadable version of our how to fix your iPod Touch 5G screen guide.
You can repair your broken or damaged iPod Touch 5th Generation using this written repair guide from Repairs Universe. If you need to replace a screen or other internal components, use this written guide to quickly and safely repair your iTouch.
iPod Touch 5th Generation Replacement Parts:
- iPod Touch 5th Generation LCD + Touch Screen Digitizer Assembly
- iPod Touch 5th Generation Touch Screen Digitizer
- iPod Touch 5th Generation LCD Screen
- iPod Touch 5th Generation Power Button Flex Cable
- And other iPod Touch 5th Generation Parts
Tools Required:
- Safe Open Pry Tool
- Small Phillips Screwdriver
- Heat Gun / Hair Dryer
iPod Touch 5th Generation take apart guide:
- The first step to opening your iTouch is to use a heat gun or hair dryer to warm the outside edges of the device. This will soften the adhesive and allow us to lift the screen out easier.
- Starting from the bottom, use a pry tool to begin lifting the screen away from the device. Note that there are two parts of the screen assembly - the screens and the mid frame.
- The mid frame may or may not come out when attempting to remove the screen. The mid frame is held into the device with plastic clips which will need to be released.
- Carefully work the screen and mid frame up, being careful as it is still connected with a few flex cables a the top.
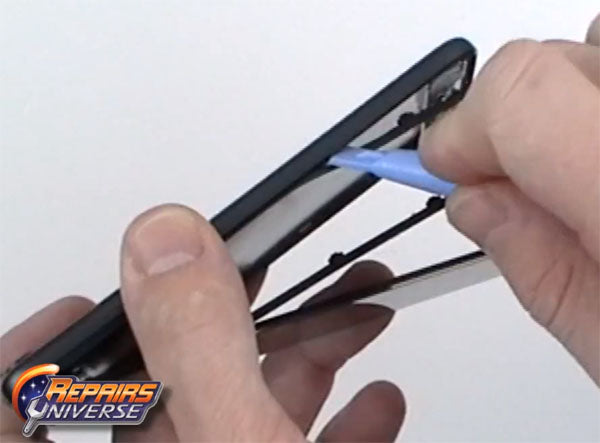
Figure 1
- Once the the clips to the mid frame are released, flip the screen out and carefully place above the device.
- Use a small Phillips screwdriver to remove the twelve (12) screws located in figure 2.
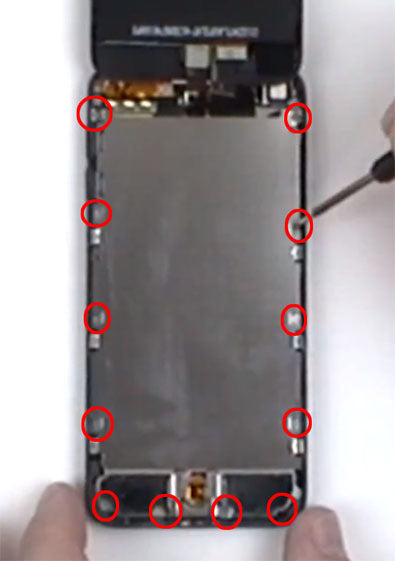
Figure 2
- With the screws removed you will now need to release the home button flex cable located near the bottom of the device. Use a pry tool to lift it from the heat shield and lift the shield away from the device, pulling the flex cable through the slot.
- The motherbord is now exposed. There will be three (3) small phillips screws to be removed, as well as 4 parts released, as shown in figure 3. The parts to be released are the front camera, rear camera, LCD flex cable, and battery.
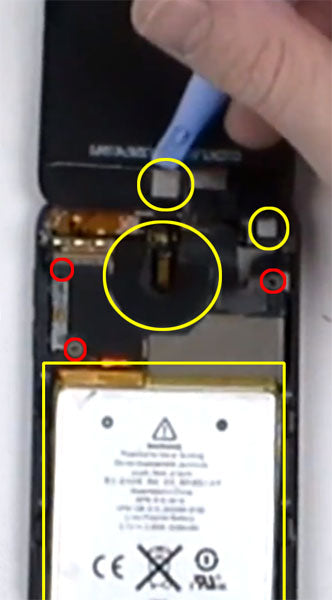
Figure 3
- With the motherboard screws removed and the four parts released we can now carefully lift the motherboard away from the back cover. Careful as it is still attached by two flex cables.
- Release the two (2) flex cables located on the back side of the motherboard. With these released you will be able to remove the screen assembly.
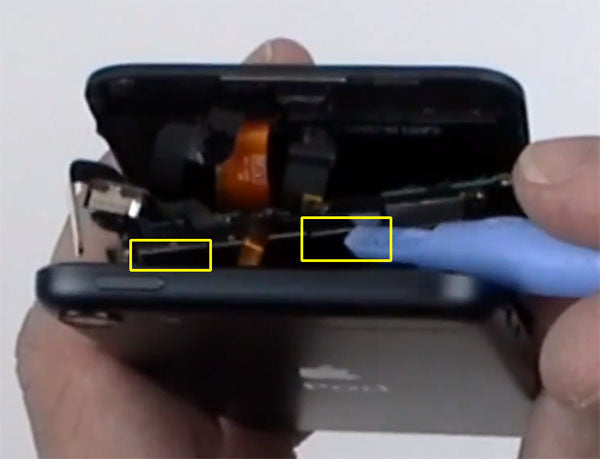
Figure 4
- We can now release the rest of the mid frame from the screen. To do this, use a heat gun or hair dryer to warm the adhesive for about 30 seconds. Once it is warmed, use a safe pry tool to lift the mid frame from the screens.
- You can then separate the screens from the mid frame and replace.
Your iTouch is now disassembled. Simply follow these insructions in reverse to reassemble your device.
Notice:
Repairs Universe's guides are for informational purposes only. Please click here for details.
Learn about restrictions on reproduction and re-use of Repairs Universe's repair/take-apart/installation guides, and about creating hyperlinks to our guides.
