LG Optimus 4X Repair Guide
June 4, 2018 | 0 Comments
This repair guide will explain how to perform LG Optimus 4X HD repairs such as the disassembly and installation of a nwe screen replacement. This guide can assist with the installation of:
- LG Optimus 4X HD P880 Touch Screen Digitizer Replacement - White
- LG Optimus 4X HD P880 Touch Screen Digitizer Replacement - Black
- LG Optimus 4X HD P880 LCD Screen Replacement
Required Tools:
- Small Phillips Screwdriver
- Adhesive Strips
- Safe Open Pry Tool
- Spudger Tool
- Heat Gun or Blow Dryer
LG Optimus 4X HD Repair Guide:
- Before beginning the repair, make sure your device is completely powered off.
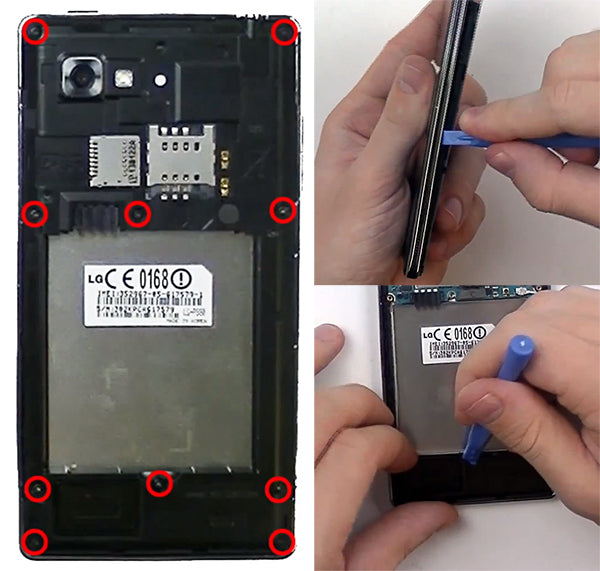
- Remove the battery cover on the back of the device, and then remove the battery, simcard, and the memory card.
- Next, use a Small Phillips Screwdriver to unscrew ten (10) Small Phillips screws which are highlighted in red in the diagram below.
- With the safe open pry tool, remove the back housing from the rest of the device by releasing the clips that hold the housing to the rest of the device. Wedge the pry tool between the seam that connects the housing to the chrome bezel, and run it along the sides of the device.
- When the back housing has been successfully removed., use your pry tool to take off the other back cover located at the bottom of the device. This cover is highlighted in orange below. This cover can be removed from the device similarly to how the first back cover was removed, using the pry tool to wedge along the sides.
- You can then use the Small Phillips Screwdriver to remove the three (3) Small Phillips screws (highlighted in red below). The screws have different sizes, so be sure to keep track so you will know where to put them back.
- After removing these screws, release the antennas and pop connectors remaining on motherboard. Use the pry tool to remove the bottom speaker located near the bottom of the device (highlighted in orange).
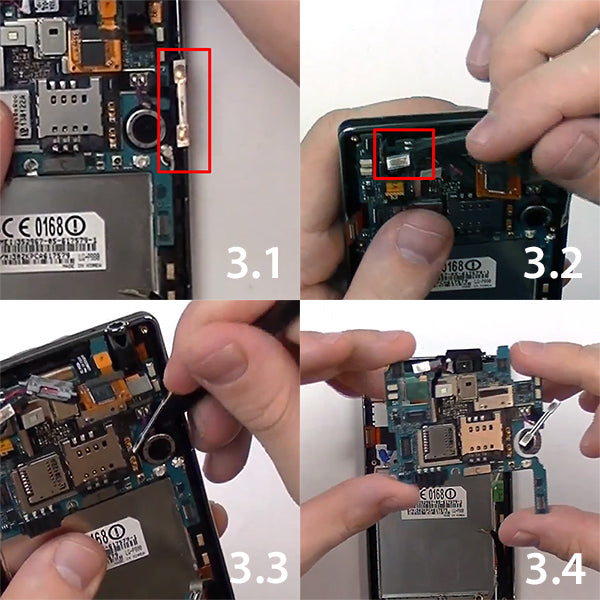
- Release the volume button flex cable (Figure 3.1) which is bound to the back housing with adhesive (also highlighted in orange on right side of device). Using the pry tool, release the adhesive covering the volume button flex cable and then lift up the cable itself without completely separating it from the rest of the device. Leave this off to the side as shown in (Figure. 3.1).
- You will now be able to use the pry tool to release the antennas and pop connectors left on the motherboard. These components are highlighted in yellow below. These parts include the headphone jack, touch screen (adhered to the motherboard), ear speaker, and main camera. Again, these pop connectors are all highlighted in the image below to the right. Using your pry tool release each connector.

- (Figure 3.1) When releasing the volume button flex leave it off the the side as shown.
- (Figure 3.2) After you have released all the connectors, the power button flex cable will need to be released, which is adhered to the power button on the top left of the device. Use a spudger tool to get under the power button and carefully release the cable from the inside of the chrome bezel.
- (Figure 3.3) Use your spudger tool to wedge under the vibrate motor, and gently lift it up from the adhesive which attaches it to the motherboard. Be conscious of not to rip any of the flex cables.
- (Figure 3.4) You can now remove the motherboard using the spudger tool to help you carefully lift it away from the rest of the device.
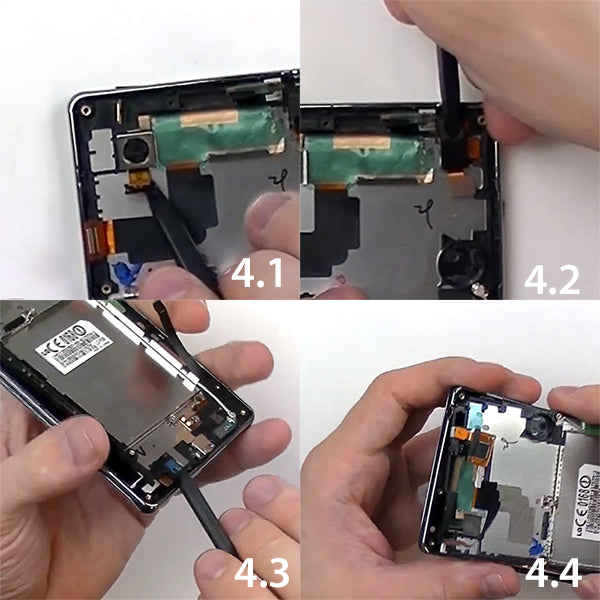
- (Figure 4.1) Use the spudger tool and remove the main camera.
- (Figure 4.2) You will no need to remove the headphone jack and the attached sensor cable. Be careful not to tear the cable when removing this part. Then the main touch screen flex cable should be lifted off the housing using the spudger tool. The lifted cable can be seen in Figure 4.4.
- (Figure 4.3) On both sides of the device there is a plastic frame attached to the housing which needs to be released.With the spudger tool, release the clips which hold the housing in place. Once all clips are released, separate the front housing.
- (Figure 4.4) To remove LCD screen, first make sure the main touch screen flex cable feeds through the housing when you remove it so that it doesn't ri[p. Then so the same thing when applying pressure to push out the LCD screen from the rest o the housing.
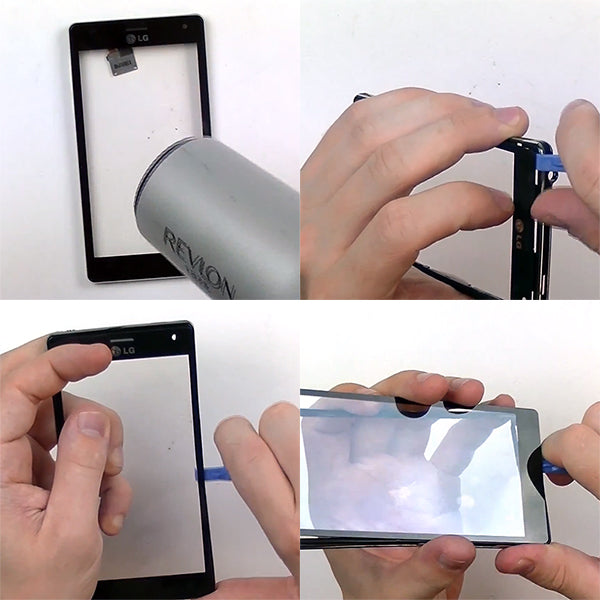
- Lastly, you are ready to remove the Glass Touch Screen.
- Use a heat gun (on low) or a hair dryer (on medium) to heat up the sides and corners of the device for approximately 45 seconds to 1 minute, holding the heat 3-4 inches from the screen. This will loosen the adhesive holding the screen in place without overheating the device. If you have difficulty wedging the screen from the housing, go back and reheat for another 30 seconds or so.
- With the pry tool, wedge between the housing and the touch screen and run the pry tool along the sides and corners releasing the screen from the adhesive and thus the housing.
- Simply reverse the order of these steps to install your new parts and reassemble your device.
RepairsUniverse's Repair Guides are for informational and learning purposes only. Perform this repair at your own risk.
Notice:
Repairs Universe's guides are for informational purposes only. Please click here for details.
Learn about restrictions on reproduction and re-use of Repairs Universe's repair/take-apart/installation guides, and about creating hyperlinks to our guides

leave a comment
Your email address will not be published. Required fields are marked *