iPad 3 Screen Repair Take Apart Guide
June 4, 2018 | 0 Comments
View the downloadable version of our how to fix your iPad 3 screen guide.
This take apart repair guide shows how to disassemble the New iPad 3 quickly and safely. This guide was designed by the Repairs Universe team and can help you replace a cracked or damaged touch screen glass digitizer, and damaged and faulty LCD display screens, as well as other internal faulty parts such as speakers, flex cables, and buttons.
This guide will help you to install the following New iPad 3 parts:
- New iPad 3 Touch Screen Glass Digitizer - Black
- New iPad 3 Touch Screen Glass Digitizer - White
- New iPad 3 LCD Display Screen
- Other New iPad 3 Parts and Accessories
Recommended Tools:
- Safe Open Pry Tools
- Small Phillips Screwdriver
- iPad Opening Tool
- Heat Gun/Hair Dryer (Suggested)
iPad 3 Screen Replacement Guide
Required Steps for Screen Repair:
- Begin by using a heat gun or hair dryer on a medium setting and warm the adhesive around the outside edges of the touch screen. This should take around 45-60 seconds to warm the adhesive.
- Using an iPad opening tool, gently insert the edge into a corner of the tablet. Gently glide the tool along the edge, releasing the adhesive. You will need to reheat the screen several times to keep the adhesive warm while removing the touch screen.
- This is a long process that should not be rushed. Take your time and work around all edges of the device until you can finally lift the digitizer. The digitizer flex cable will be located in the bottom left of the iPad as show in Orange in Figure 1. Be cautious of this and swing the digitizer to the left to avoid damaging the flex cable.
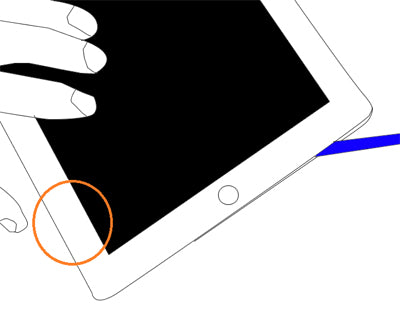
Figure 1
- With the iPad open, use a small Phillips screwdriver to remove the 4 screws as shown in the image.
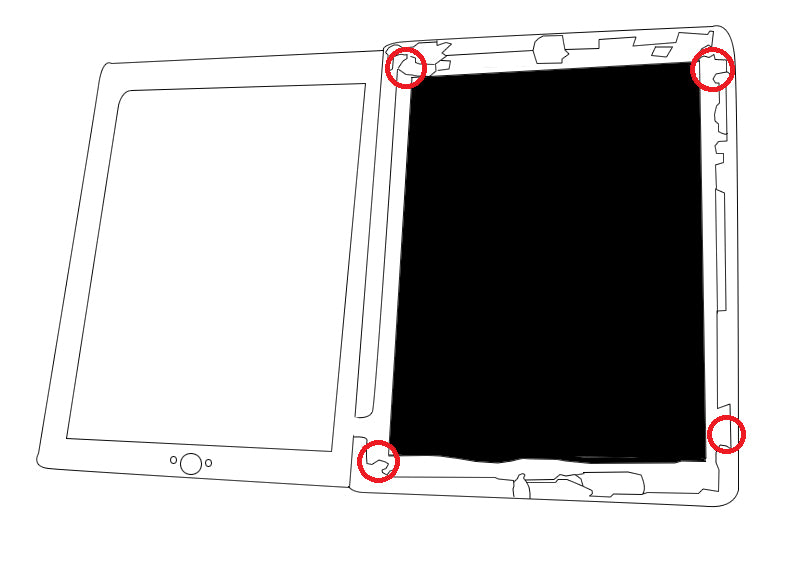
Figure 2
- Carefully swing the LCD screen up and to the left. Carefully lay it on top of the touch screen.
- We now have access to both the LCD screen flex cable and the touch screen digitizer flex cable.
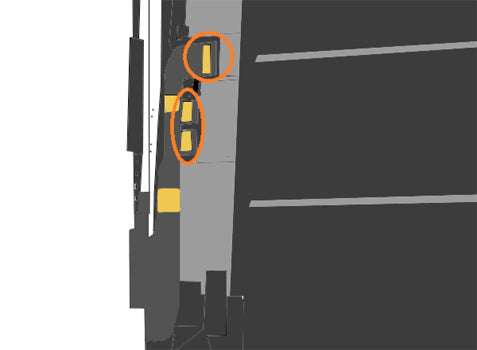
Figure 3
- If replacing the LCD screen, carefully lift the flex cable to release the adhesive holding the cable to the housing. Follow the cable connector. It will be the top orange circle on Figure 3.
- Lift the tab located on the battery side of the connector using a safe open pry tool. With the lock opened, gently remove the old cable from the connection.
- The LCD can now be replaced.
- If replacing the touch screen digitizer, follow the LCD flex cable and lift the adhesive holding the cable to the housing. Carefully move the LCD screen out of the way of the touch screen flex cable. You can now follow the touch screen digitizers flex cable to its connector. This will be the lower orange circle in Figure 3. This will have two latches that need to be lifted.
- Now, lift the adhesive holding the touch screen digitizer flex cable in place. With the latches open, the flex cable can easily slide out of the connector.
- The touch screen digitizer can now be replaced.
iPad 3 Battery Replacement Guide
This take apart repair guide shows how to disassemble the iPad 3 to quickly and safely replace the iPad 3's battery.
Required Steps for Battery Repair:
- Begin by using a heat gun or hair dryer on a medium setting and warm the adhesive around the outside edges of the touch screen. This should take around 45-60 seconds to warm the adhesive.
- Using an iPad opening tool, gently insert the edge into a corner of the tablet. Gently glide the tool along the edge, releasing the adhesive. You will need to reheat the screen several times to keep the adhesive warm while removing the touch screen.
- This is a long process that should not be rushed. Take your time and work around all edges of the device until you can finally lift the digitizer. The digitizer flex cable will be located in the bottom left of the iPad as show in Orange in Figure 1. Be cautious of this and swing the digitizer to the left to avoid damaging the flex cable.
Figure 1
- With the iPad open, use a small Phillips screwdriver to remove the 4 screws as shown in the image.
Figure 2
- Carefully swing the LCD screen up and to the left. Carefully lay it on top of the touch screen.
- We now have access to both the LCD screen flex cable and the touch screen digitizer flex cable.
Figure 3
- If replacing the LCD screen, carefully lift the flex cable to release the adhesive holding the cable to the housing. Follow the cable connector. It will be the top orange circle on Figure 3.
- Lift the tab located on the battery side of the connector using a safe open pry tool. With the lock opened, gently remove the old cable from the connection.
- The LCD can now be replaced.
- If replacing the touch screen digitizer, follow the LCD flex cable and lift the adhesive holding the cable to the housing. Carefully move the LCD screen out of the way of the touch screen flex cable. You can now follow the touch screen digitizers flex cable to its connector. This will be the lower orange circle in Figure 3. This will have two latches that need to be lifted.
- Now, lift the adhesive holding the touch screen digitizer flex cable in place. With the latches open, the flex cable can easily slide out of the connector.
- The touch screen digitizer can now be removed.
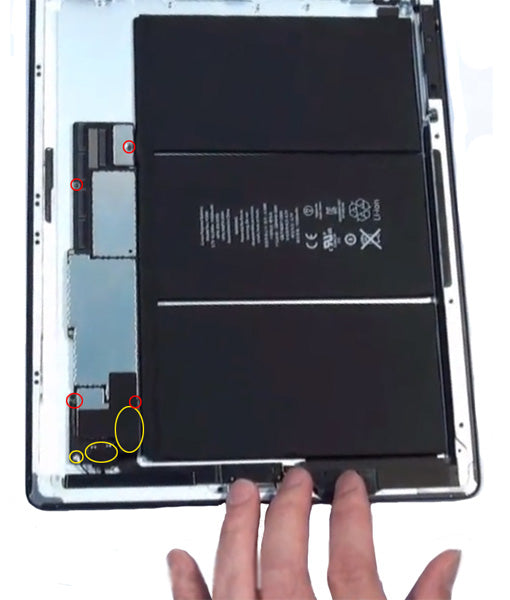
Figure 4
- On the lower section of the motherboard we will have 3 flex cables to release, as shown in figure 4. Once these cables are released, remove the 4 small phillips screws located in figure 4.
- The motherboard can now be removed.
- In order to remove the battery we will need to heat the outside of the casing to release some of the adhesive. Once this adhesive is slightly warmed, use a pry tool to gently lift up each battery cell, being careful not to bend them. The battery can now be replaced.
Notice:
RepairsUniverse does not accept any liability for damage, or injury caused, while you are following our disassemble guides. We make no representations, warranties, or conditions of any kind, express or implied. Utilizing these guides to assist you in repairing your mobile devices will void your warranty. RepairsUniverse strictly prohibits altering or modifying our teardown guides for commercial use, reproduction, or publication
