Samsung Galaxy S 4G Take Apart Repair Guide
June 4, 2018 | 0 Comments
View the downloadable version of our how to fix your Samsung Galaxy S 4G screen guide.
Our take apart repair shows how to disassemble the Samsung Galaxy S 4G T959V smartphone quickly and safely. This video has been put together by the RepairsUniverse team and will help you install replacement parts to repair your damage phone.
This guide will help you to install the following Samsung Galaxy S 4G T959V part(s):
Tools Required:
- Safe Open Pry Tool
- Small Phillips Screwdriver
- Adhesive (For screen repair)
- Heat Gun / Hair Dryer
Samsung Galaxy S 4G T959V LCD and Touch Screen Digitizer Repair Guide:
- Begin by removing the battery door, battery, SIM card, and the memory card.
- Using the Small Phillip screw driver, remove the seven screws from the back of the phone.
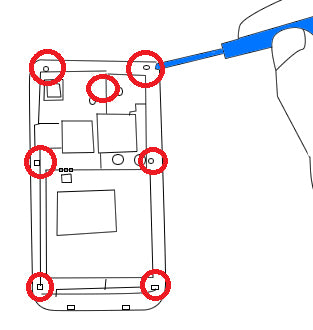
Figure 1
- Using the plastic pry tool, carefully slide and twist all around the phone separately in the front from the back. It is no more for the plastic to make some cracking noises as your on snapping and separating it into two pieces, but be very careful not to press the pry tool too far in damaging the internal components of the phone.
- Also, most of the side buttons will fall out during this process, so be sure to keep track of them and save them for reassembling.
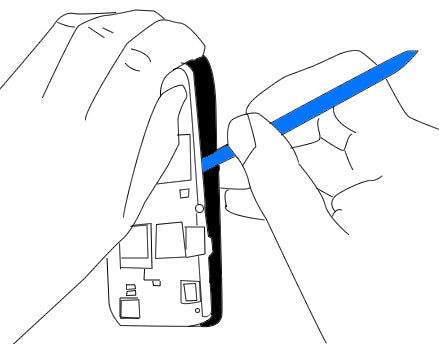
Figure 2
- Using the pry tool, carefully lift and unsnapped the top earpiece speaker flex cable from the board. Do the same for the larger LCD screen flex cable to the left. And now the bottom flex cable.
- Lift up and gently detached the white antenna cable.
- Now, using the pry tool, gently lift up the mother board. Do this very carefully and make sure that you do not damage the power button flex cable on the side.
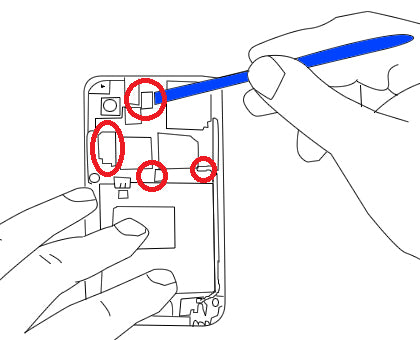
Figure 3
- Now we are going to remove the earpiece flex assembly which includes the headset jack, earpiece speaker, and light sensor. Carefully pry out the headset jack, but before removing it completely, use your pry tool to get under the flex cable and release the blue tape holding it down.
- Now carefully pry out the light sensor and the earpiece speaker with your all connected with the flex cable.
- Using the pry tool, detach the white coax antenna cable from the LCD assembly.
- Now, use a heat gun or hair dryer to warm the adhesive holding the screen assembly to the front housing. Use medium heat on the front of the screen, consistently moving around the screen edges. This should take no longer than 1 minute.
- Use a safe open pry tool to release the screen assembly from the housing. Reheat if the adhesive is still strong.
- Remove the screen from the housing and replace.
Notice:
Repairs Universe's guides are for informational purposes only. Please click here for details.
Learn about restrictions on reproduction and re-use of Repairs Universe's repair/take-apart/installation guides, and about creating hyperlinks to our guides.