Samsung Galaxy S4 Mini Take Apart Repair Guide
June 4, 2018 | 0 Comments
This repair guide will show you how to take apart the Samsung Galaxy S4 Mini in order to perform a repair and help you fix a cracked or shattered touch screen digitizer, a damaged LCD screen, or other faulty internal parts such as flex cables, buttons, and speakers. You are welcome to use this repair guide to assist you in taking apart your Galaxy S4 Mini to replace the parts you need to get your device looking and working like brand new again!
This tutorial will help you to install the following Samsung Galaxy S4 Mini parts:
- Samsung Galaxy S4 Mini LCD + Touch Screen Assembly - Blue
- Samsung Galaxy S4 Mini LCD + Touch Screen Assembly - White
- Other Samsung Galaxy S4 Mini parts
Tools Required:
Samsung Galaxy S4 Mini Repair Guide:
How to Fix a Samsung Galaxy S4 Mini (Step-by-Step Guide) :
- Begin the repair by making sure your device is completely powered off.
- Then remove the back battery cover. Note, the cover is most easily removed by lifting the tab near the power button. Once the cover is removed, take out the battery, sim card, and memory card (the cards are found directly beneath the battery).
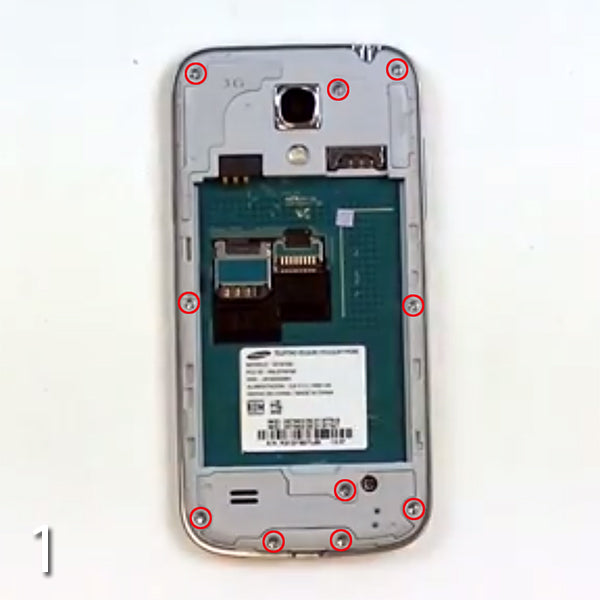
- Now using a Small Phillips Screwdriver, remove the ten (10) Small Phillips screws that are located on the back housing (circled in red in Figure 1).
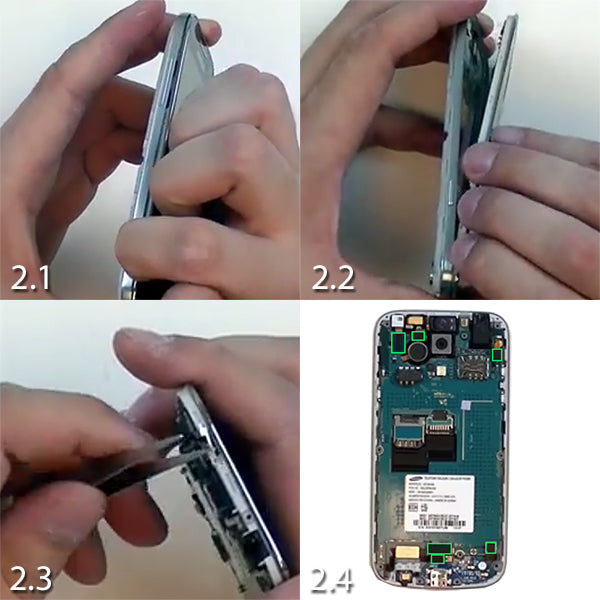
- With the screws removed you can now remove the back housing. Using either a Safe Open Pry Tool or your fingernail, wedge between the seam of the housing and the screen assembly and glide along the sides (including top and bottom) releasing the clips that hold the housing in place (Figure 2.1 & Figure 2.2).
- After the back housing has been removed, you will now release all the motherboard connections in order to remove the motherboard.
- First, at the top left corner you will remove a small metal cover which covers the camera and proximity sensor. Using tweezers remove the metal cover (Figure 2.3).
- Next will be six (6) pop connectors on the motherboard that need to be released using the pry tool (all highlighted in green in Figure 2.4). Simply pry under the connections and lift up to release them.
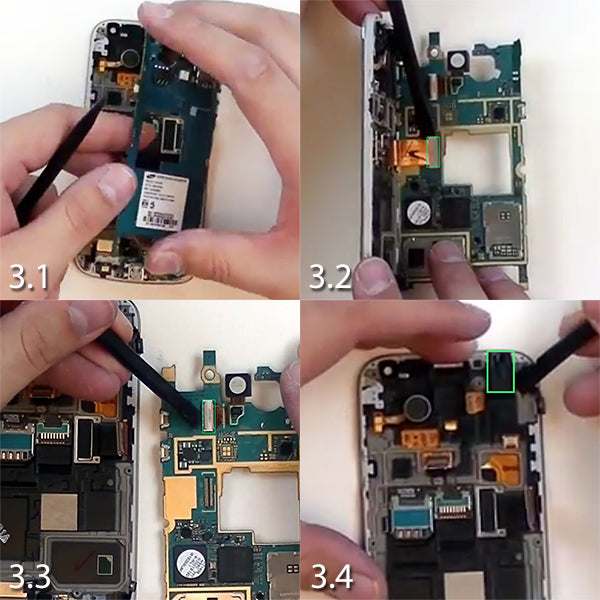
- Now you can swing over the motherboard to the right (still a cable connected underneath), by lifting up the left side and flipping the motherboard to the right (Figure 3.1). Note, during this step the ear speaker flex cable (top right) should fallout, and be placed to the side for reassembly later.
- With the motherboard swung open, you will release the connection to the screen flex cable (Figure 3.2). This will fully remove the motherboard.
- After the motherboard has been removed, you can access and remove the main camera which is held in place by a jaw connector. Using the pry tool lift the black tab to the left of the camera, and remove the camera (Figure 3.3)
- Remove the Headphone Jack located near the top right (highlighted in Figure 3.4).
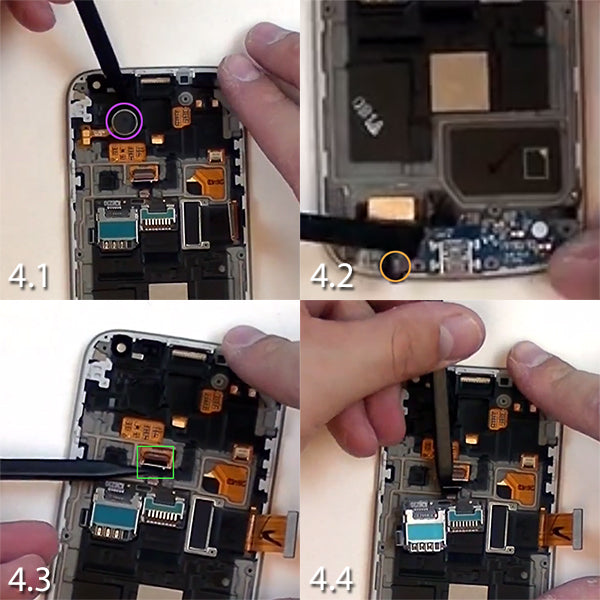
- The next component to remove is the Vibrate Motor, which is located near the top left (highlighted in Figure 4.1). This part will take a little bit of extra prying because it is held down with relatively strong adhesive. However, it is important to use caution as the cable it is connected to is very fragile.
- Using your pry tool remove the Dock Port flex cable. This is done by releasing the microphone (highlighted in orange) and wedging beneath the cable in order to remove it (Figure 4.2).
- Lastly, you will remove the sim card and micro SD card flex cable. To release the cable lift up on the tab that hold it down, and then pull out the flex cable (Figure 4.3).
- Now you can lift out the flex cable using your pry tool (Figure 4.4).
- You are now finished disassembling your device.
Notice:
Repairs Universe's guides are for informational purposes only.Please click here for details.
Learn aboutrestrictions on reproduction and re-useof Repairs Universe's repair/take-apart/installation guides, and about creating hyperlinks to our guides