Xbox 360 Repair Guides & Videos
June 3, 2018 | 0 Comments
Need to take apart your Xbox 360 to perform repairs? This guide will walk you through all the steps required to quickly take apart your game console. Following this guide will insure quick and safe repair is made with no damage done to your console.
This guide will help you to install the following Xbox 360 part(s):
Tools Required:
Xbox 360 Take apart guide:
- To begin disassembly, start with removing the hard drive located at the top. Simply press the button down and pull the hard drive up.
- With this removed we can now remove the front plate. To do this use your opening tool to pull it around the edges until it pops off.
- Now we need to remove the top and bottom mesh. To do this we need to use the pointy end of your tool to release the 8 clips on each mesh. Starting with the top, place the pointy end into the holes on the side to begin releasing the clips as shown in Figure 1.
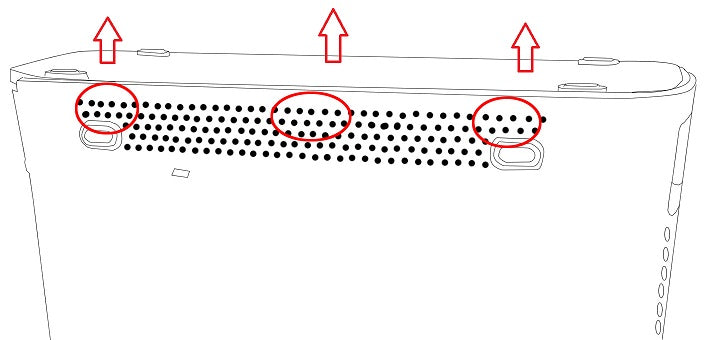
Figure 1
- Swapping to the bottom you will need to release the clips again, same as the top.
- Now, time to remove half of the casing. On the back side of the case there will be several clips which will need to be released, as shown in Figure 2.

Figure 2
- Use the tool to press in and release all these clips. they are all released, move to the front of the device. There will be four (4) clips which are larger which will need to be released. The under side of the Xbox can now be removed.
- On the bottom will be six (6) large T10 screws to be removed as shown in Figure 3.
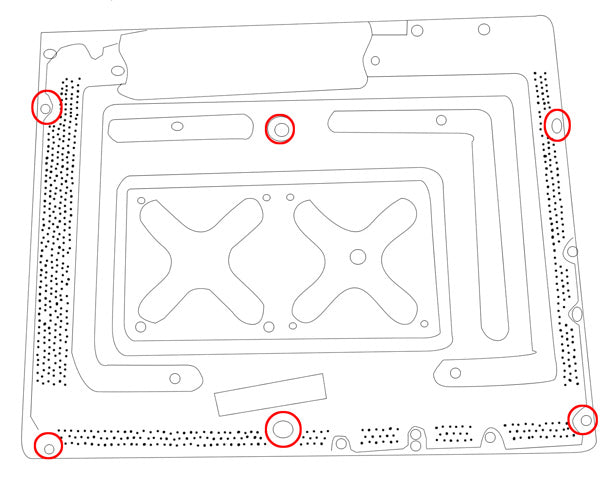
Figure 3
- Carefully release the eject button on your disk drive.
- The top cover can now be removed fully, exposing the guts of the Xbox.
- Begin by removing the DVD drive (green) and releasing the power cable on the back of the drive.
- If replacing the laser on your drive, do the following: remove the screws located on the under side of the drive, then remove the casing over the drive. Release the three (3) tab connectors on the main board and remove the board. After the connections are released. Remove the top cable on the laser and the two (2) small Phillips screw located on the white guide and laser guide rod. You can then lift the rod up and remove and replace the laser.
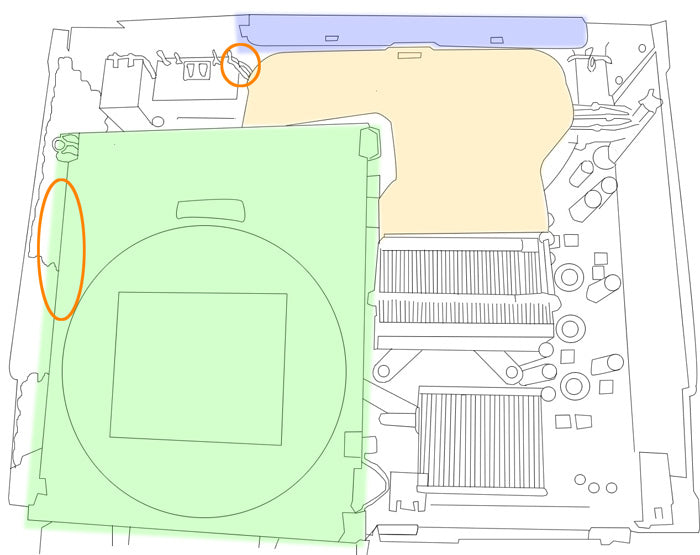
Figure 4
- If pulling out the motherboard, flip the device over and remove the remaining Torx T10 screws on the back. Older 360 models will have eight (8) torx T8 screws also which will need to be removed.
- You can now release the white fan shroud from the top of the board (orange in figure 4). It will be held in place by a few plastic clips.
- Release the power button at the front of the device by unclipping the top and bottom. Now remove the (three) 3 Torx T8 screws as shown in Figure 4.
Figure 5
- You will now need to release the single connection located on the fan (blue in figure 4). With the connection released, remove the fans.
- You can now remove the motherboard from the metal casing.
Your Xbox 360 is now fully disassembled.
Notice:
Repairs Universe's guides are for informational purposes only.Please click here for details.
Learn about restrictions on reproduction and re-use of Repairs Universe's repair/take-apart/installation guides, and about creating hyperlinks to our guides.

leave a comment
Your email address will not be published. Required fields are marked *