HTC HD7 Take Apart Repair Guide
June 4, 2018 | 0 Comments

View the downloadable version of our how to fix your HTC HD7 screen guide.
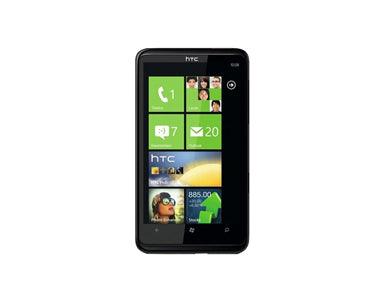
RepairsUniverse team designed a take apart repair guide to show how to disassemble the HTC HD7 quickly and safely. This repair guide has been put together and will help you install replacement parts to repair your damage phone.
This guide will help you install the following HTC HD7 part (s):
Required Tools.
- Safe Pry Opening Tool
- T6 Torx Screwdriver
- T5 Torx Screwdriver
- Adhesive Strips (For Touch Screen Repair)
- Heat Gun/Hair Dryer
HTC HD7 take apart repair guide:
- The first step is to remove the battery cover and the battery from phone.
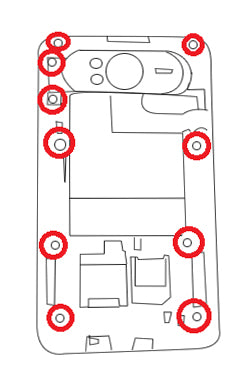
- Remove the bottom cover using safe pry tool. Once removed, use T5 torx screwdriver to remove ten (10) screws as shown in Figure 1.

Figure 1
- Use safe pry tool to separate the back housing.
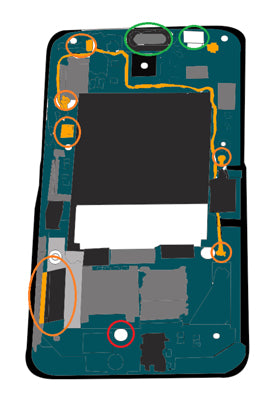
- To separate the motherboard from the front housing, disconnect all the connection as you can see at the illustration below.

Figure 2
- Once all the connection is release, you can now start prying off the motherboard starting at the top portion. The middle part of the board, it is held with glue so be careful to lift up the motherboard to prevent from any damaged. Then remove 1 screw at the bottom part to totally separate the motherboard from the front housing.
- Next, use a heat gun or hair dryer to warm the adhesive holding the screen assembly to the front housing. Use medium heat on the front of the screen, consistently moving around the screen edges. This should take no longer than 1 minute.
- Use a safe open pry tool to release the screen assembly from the housing. Reheat if the adhesive is still strong.
- Remove the screen from the housing and replace.
- The digitizer can now be remove. Use a heat gun or hair dryer to warm the adhesive holding the screen assembly to the front housing. Use medium heat on the front of the screen, consistently moving around the screen edges. This should take no longer than 1 minute. Reheat if necessary.
- Use safe pry tool or push it forwards from behind by pushing on the corners.
- Remove the screen from the housing and replace.
Simply replace the damaged parts with the new ones and reverse the order to put your phone back together again.
Applying Adhesive to the Touch Screen Digitizer:
Now you will be able to replace any parts on your HTC HD7. Simply replace the damaged parts with the new ones and reverse the order to put your phone back together again.
Notice:
Repairs Universe's guides are for informational purposes only. Please click here for details.
Learn about restrictions on reproduction and re-use of Repairs Universe's repair/take-apart/installation guides, and about creating hyperlinks to our guides.

