Nokia Lumia 820 Screen Repair Guide
June 4, 2018 | 0 Comments

The Repairs Universe team put together this repair guide for the Nokia Lumia 820 allowing owners to be able to tear down this device themselves to perform repairs like replacing a broken glass digitizer or cracked LCD screen. Using this tear down tutorial will show you the proper steps to take when disassembling this device.
This repair guide will help when needing to install the following Nokia Lumia 820 parts:
Required Tools:
- Torx T6 Screwdriver
- Torx T3 Screwdriver
- Adhesive Strips
- Safe Open Pry Tool
- Heat Gun or Blow dryer
How to Fix a Nokia Lumia 820 (Step-by-Step Tutorial) :
- First you will want to make sure device is fully powered off.
- Next you can take your pry tool starting from the top of the device and remove the back cover.
- Then remove your battery, sim card, and micro SD card.
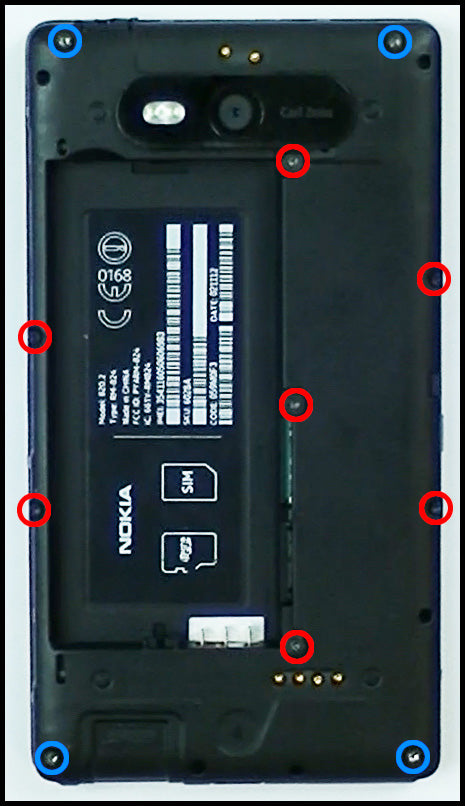
- You will now need to take your Torx T3 and T5 screw drivers and remove the eleven (11) screws circled in the figure below.
- NOTE: The screws circled in BLUE are Torx T6 size and the screws circled in RED are the Torx T3 size.
See figure below for screw locations.
- With all the screws removed you can now remove the back housing. It should lift off quite easily.
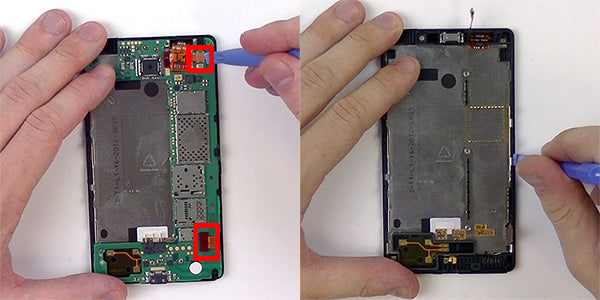
- Now that the motherboard is exposed you can release the two (2) pop-connectors highlighted in the figure below.
- This will allow you to remove the motherboard from the housing. NOTE: Use proper care when handling the motherboard.
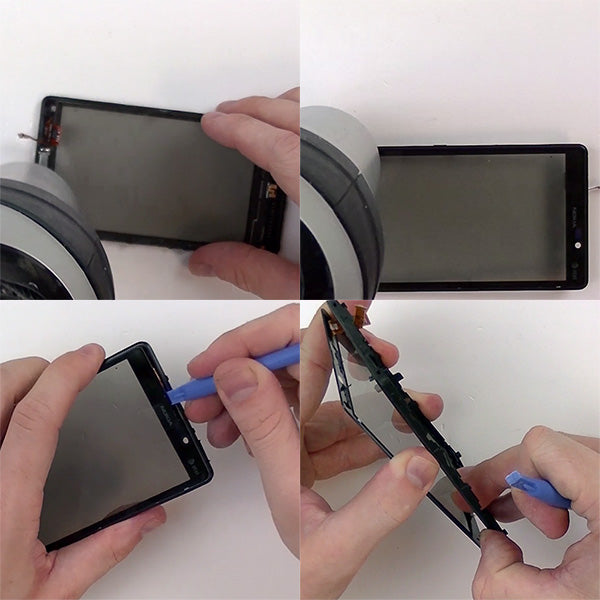
- Next take your safe open pry tool and pry up the LCD screen from the from front frame and touch screen digitizer.
See figure below for reference.
- Next you will need to apply a little heat to the outer bezel of screen. This will loosen up the adhesive and allow you to separate the glass touch screen from the frame.
- Use your heat source on a medium setting for about 30-45 seconds. You may need to re-apply heat to stubborn areas.
- Once the adhesive has been properly heated take your pry tool and insert it in the seam of the glass and frame.
- You will start to have enough lift to slide your pry tool along the sides of the frame to be able to remove it completely.
See figure below for reference.
Notice:
Repairs Universe's guides are for informational purposes only. Please click here for details.
Learn about restrictions on reproduction and re-useï of Repairs Universe's repair/take-apart/installation guides, and about creating hyperlinks to our guides