HTC Vivid Take Apart Repair Guide
June 4, 2018 | 0 Comments
View the downloadable version of our how to fix your HTC Vivid screen guide.
This written guide for the HTC Vivid will walk you through fully disassembling and replacing nearly all internal components. This guide has been compiled by the RepairsUniverse team and can be used to safely and quickly replace damaged or faulty parts, such as a cracked glass touch screen digitizer, damaged LCD display,
This guide will help you to install the following HTC Vivid part(s):
- HTC Vivid Touch Screen Digitizer Replacement - White
- HTC Vivid Touch Screen Digitizer Replacement ? Black
- HTC Vivid LCD Screen Replacement
Tools Required:
- Safe Open Pry Tool
- Small Phillips Screwdriver
- Adhesive Strips (For Touch Screen Replacements)
- Hot Air Gun / Hair Dryer
HTC Vivid take apart/repair guide:
- In order to disassemble HTC Vivid, first of all you need to remove the back cover, the battery, and the sim and memory card.
- Using the Small Philips screwdriver, remove the six (6) screws as shown in Figure 1.
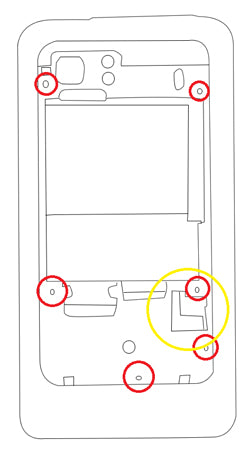
Figure 1
- Then remove charging port connector cover and gently pry up the connector. This is a simple "pop" connector.
- Use a safe open pry tool to carefully pry the back housing from the rest of the phone. Work your way around the edges, as shown in Figure 2.
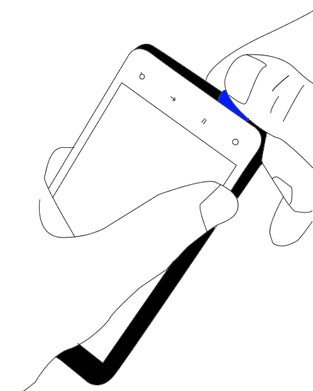
Figure 2
- Remove the vibrator motor from the housing and carefully disconnect it, as shown in orange on Figure 3.
- Remove the six (6) small Phillips screws on the motherboard, as shown in red in Figure 3.
- Pry up to release battery tray.
- Remove the two (2) silver small Phillips screws still holding the motherboard in place as shown in yellow.
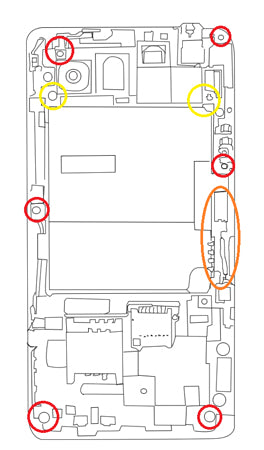
Figure 3
- On the lower section of the motherboard there will be two (2) pop connector located on the under side. Carefully lift the board and release these cables.
- Release the clips holding the upper part of the motherboard in place. Gently fold the motherboard and motherboard flex over to the right.
- You can now remove the one "jaw" connector and remove the full motherboard assembly.
- Remove mylar tape holding the touch screen flex cable in place. Gently fold this away from the device.
- Heat the screen with hair dryer or hear gun on medium heat for 45-60 seconds to warm the adhesive holding the touch screen in place.
- Use a safe open pry tool to carefully run along the edges, releasing the adhesive. Be careful not to go too deep into the device.
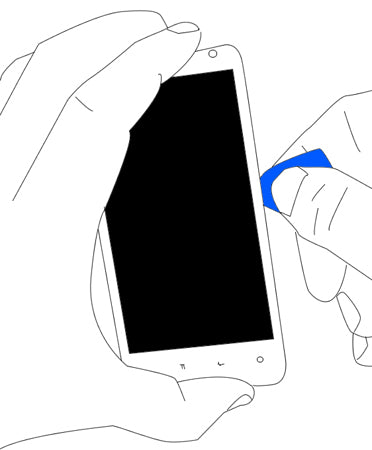
Figure 4
- Reheat if needed.
- Fully remove the screen from the rest of the device.
- Remove or peel back the outer adhesive on the LCD screen.
- Heat the back of the screen assembly to loosen the adhesive holding the LCD screen in place.
- You can now pry the LCD screen out of the device and replace either screen.
Applying Adhesive to the Touch Screen Digitizer:
Simply replace the damaged parts with the new ones and reverse the order to put your phone back together again.
Notice:
Repairs Universe's guides are for informational purposes only. Please click here for details.
Learn about restrictions on reproduction and re-use of Repairs Universe's repair/take-apart/installation guides, and about creating hyperlinks to our guides.